10.4 Installing and Configuring a CD-ROM Drive
External
CD-ROM drives are "installed"
simply by connecting them to the USB, parallel, or SCSI port, as
appropriate, and connecting power, although SCSI models may require
setting jumpers to configure SCSI ID and termination. Internal CD-ROM
drives are 5.25-inch half-height devices, and require the same
physical installation steps as any other 5.25-inch externally
accessible drive. The exact configuration steps required differ
between ATAPI and SCSI interfaces, as described in the following
sections.
10.4.1 Installing and Configuring an ATAPI CD-ROM Drive
ATAPI CD-ROM drives are
installed just like any other ATAPI/IDE device. Other than physical
installation, the only decisions you need to make are whether to
install the drive on the Primary or Secondary ATA interface and
whether to jumper the drive as Sole, Master, or Slave. In general,
use the following guidelines:
On a system with one or two ATA hard drives and one ATAPI CD-ROM
drive, install the first hard drive as Primary Master (PM), the
second hard drive, if present, as Primary Slave (PS), and the CD-ROM
drive as Secondary Master (SM). On a system with three ATA hard drives and a CD-ROM drive, install
the first hard drive as PM, the second hard drive as PS, the third
hard drive as SM, and the CD-ROM drive as Secondary Slave (SS). On a system with one or two ATA hard drives, an ATAPI CD-ROM drive,
and an ATAPI tape drive, install the hard drives as explained
previously, the CD-ROM drive as SM, and the tape drive as SS. On a system with an ATA hard drive, an ATAPI CD-ROM drive, and an
ATAPI CD writer, jumper the hard drive PM, the CD-ROM drive PS, and
the CD writer SM. The goal is to have the CD writer on a different
ATA channel than any drive that may be used as a source, including
the CD-ROM drive and the hard drive. On a system with two ATA hard drives, an ATAPI CD-ROM drive, and an
ATAPI CD writer, jumper the first hard drive PM, the CD-ROM drive PS,
the second hard drive SM, and the CD writer SS. Recognize that
attempting to create a CD from data on the second hard drive risks
data corruption because the second hard drive and the CD writer are
on the same ATA channel. On a system with an ATA hard drive, an ATAPI CD-ROM drive, an ATAPI
CD writer, and an ATAPI tape drive, jumper the hard drive PM, the
CD-ROM drive PS, the CD writer SM, and the tape drive SS.
ATAPI CD-ROM drives require no special configuration steps to
function. All recent operating systems, including Windows 95/98,
Windows NT/2000/XP, and Linux, load ATAPI drivers and recognize ATAPI
drives automatically.
|
We occasionally receive reports of
ATAPI CD-ROM drives that work properly when configured as a Slave,
but not when configured as a Sole or a Master drive, even when they
are the only devices on the channel. We have never encountered this
situation in working with hundreds of systems and CD-ROM drives over
the years. However, it has been reported to us often enough that we
believe a problem may exist, although we do not have adequate
information to determine what combination of controller, drive,
operating system, and so on causes the problem.
In theory, any ATAPI CD-ROM drive can function as a Master, Slave, or
Sole drive on an ATA channel. That has been our experience. Many
CD-ROM drives are designed to function properly as the only drive on
a channel even when they're jumpered as a Slave.
That's done as a matter of convenience and to avoid
support calls when a user forgets to change the default jumpering,
which is almost always Slave. Configuring an ATAPI device as a
Master-less Slave is not officially supported in the ATA/ATAPI
specification, though.
We speculate that one possible cause of the confusion is that an ATA
channel may be set to use bus mastering (DMA). If
that's the case, making a non-DMA capable CD-ROM
drive the Master might indeed cause problems, although we have not
tried this configuration. A channel must run both devices as either
PIO or DMA, and the presence of a non-DMA device on the channel
should make that channel revert to PIO, whatever the configuration
settings happen to be. Most (but not all) currently shipping ATAPI
CD-ROM drives are DMA-capable.
|
10.4.2 Enabling Bus Mastering (DMA) Support
By default, ATAPI CD-ROM drives may
operate in Programmed I/O (PIO) mode rather than DMA mode, which is
also called Bus Mastering mode. The fact that PIO mode limits DTR to
16.7 MB/s versus the 33.3 or 66.7 MB/s DTR available with DMA is
unimportant because no CD-ROM drive even approaches the DTR limit of
PIO mode. What is important is that PIO mode causes much higher CPU
utilization than DMA mode. A typical ATAPI CD-ROM drive operating in
PIO mode may occupy 80% or more of the CPU when the drive is being
accessed heavily, while the same drive operating under the same
conditions in DMA mode may occupy only 1% to 5% of CPU time.
Accordingly, enabling DMA mode is usually a good idea, but doing so
requires that the BIOS, operating system, chipset, and CD-ROM drive
itself all support DMA mode. Most recent ATAPI CD-ROM drives support
DMA mode. Most motherboards of late-model Pentium vintage or later
also support DMA mode on their embedded ATAPI interfaces.
10.4.2.1 Enabling bus mastering (DMA) support with Linux
Linux DMA support differs
significantly by distribution and version. Older Linux releases had
limited support for UDMA, particularly for ATAPI devices. Recent
releases generally recognize DMA-capable ATAPI devices and
automatically configure the interface optimally. To determine the
status of DMA, open a terminal window, change to the /proc/ide directory, and list the contents.
That list displays the drivers for each IDE/ATAPI device and
interface. It also contains a file, named for the chipset in use,
that lists the current DMA status for each interface and drive.
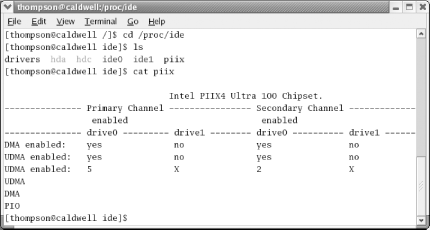
Figure 10-6 shows the contents of the file
/proc/ide/piix on an Intel system
running Red Hat Linux 8.X. This system has two ATA interfaces. The
primary ATA interface is IDE0 and the secondary is
IDE1. Note that this file designates the Master on
each interface as drive0 and the Slave as
drive1, rather than naming each of the four
devices uniquely as drive0 through
drive3.
Two devices are connected, one to each interface. Device
hda, an ATA-100 hard drive, is
drive0 (Master) on the Primary Channel. Device
hdc, a DMA-capable CD writer, is
drive0 (Master) on the Secondary Channel. The list
shows that DMA and UDMA are enabled for both devices. The second
"DMA enabled:" line should really
read "DMA level:". It shows that
UDMA-5 (ATA-100) is enabled for hard drive hda and
UDMA-2 for CD writer hdc.
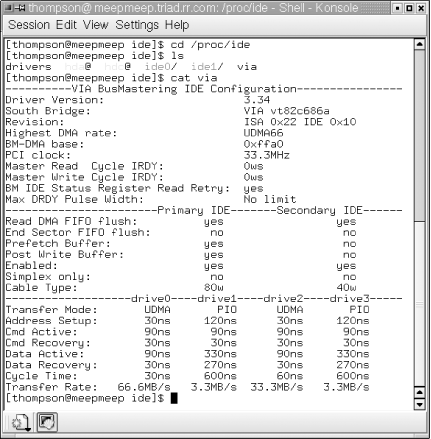
For comparison, Figure 10-7 shows the contents of
the file /proc/ide/via on an AMD
system running Mandrake 9.X. The filename is via rather than piix because the system uses a VIA chipset
rather than an Intel chipset. This file presents information similar
to the piix file in the preceding
example, but in more detail and arranged differently.
The first section lists details about the bus mastering configuration
and capabilities of the system. The middle section describes the
features, capabilities, and configuration of the primary and
secondary IDE interfaces. The final section lists the transfer modes
for drive0, an ATA-66 hard drive, and
drive2, a UDMA-capable CD-ROM drive. Although
drive1 and drive3 are listed as
operating in PIO mode at 3.33 MB/s, that is simply the default value
used when no drive is installed, as is the case here.
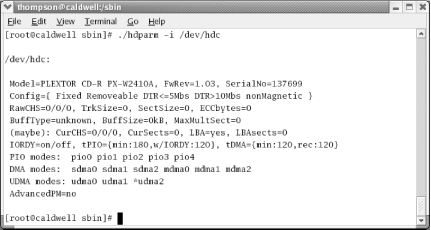
You can also use the hdparm command to view DMA
settings, as shown in Figure 10-8. This system has a
Plextor CD writer installed as hdc (the Secondary
Master). Logging on as root and entering the command
hdparm -i /dev/hdc lists
information about the drive, including the transfer modes it
supports. This drive supports PIO modes 0 through 4, all single-word
(sdma) and double-word (mdma)
DMA modes, and UDMA modes 0, 1, and 2. The asterisk next to
udma2 indicates the drive is currently using UDMA
Mode 2.
In most cases, as in these examples, a UDMA-aware kernel detects
UDMA-capable devices and interfaces and automatically enables the
highest level of UDMA common to the device and interface. If a
UDMA-aware kernel does not enable UDMA for UDMA-capable hardware,
that generally means either the kernel lacks the proper chipset
driver or the kernel thinks enabling DMA isn't safe.
 |
If hdparm shows Linux is using a slower UDMA mode
than the device and interface are capable of, check the cable. For
example, if hdparm lists the current UDMA mode as
udma2 (ATA-33), but you are certain the hardware
supports ATA-100, verify that the device is connected with an 80-wire
UDMA cable. ATA-66 and higher require an 80-wire cable to operate at
full speed. Using a 40-wire cable forces the hardware to drop back to
udma2 mode.
|
|
In the first situationin
which the Linux distribution doesn't fully support
the UDMA features of the chipsetcheck the web site to see if a
patch is available for that chipset. In the second situation, proceed
with caution. Linux may not have enabled UDMA for a trivial reason,
such as your BIOS not reporting the drive capabilities accurately. In
that case, updating the main system BIOS may (or may not) solve the
problem.
But it's also possible that
Linux did not enable UDMA because it determined that doing so risked
data corruption. Accordingly, although it is possible to do so, we
strongly recommend you not force Linux to use UDMA. If despite our
advice you insist on forcing DMA, you can do so using either kernel
boot parameters (for kernel 2.1.113 or higher) or the
hdparm command. For details, see the manpage for
hdparm.
10.4.2.2 Enabling bus mastering (DMA) support with Windows
All versions of Windows 98,
2000, and XP support DMA/UDMA modes. The exact steps required to
enable DMA mode differ according to your chipset and the exact
version of Windows you are using, as follows:
- Windows 98/98 SE/Me
-
The original Windows 98
release and Windows 98 SE are both identified as 4.10.1998, and both
are supplied with a native DMA driver, as is Windows Me. Use that
driver rather than the driver supplied by Intel or another chipset
manufacturer. The Microsoft drivers require DMA support in BIOS, so
you may need to flash your system BIOS to the latest version before
installing the driver. Before installing the Microsoft driver, remove
the Intel BM-IDE driver (if present) by running the BM-IDE
installation program and choosing deinstall. To install the Microsoft
driver,
Right-click My Computer, choose Properties, and then click the Device
Manager tab. Locate the CD-ROM drive and double-click it to display the Properties
sheet. Click the Settings tab and mark the DMA checkbox in the Options
section. Close the dialog and reboot the system. Redisplay the Properties sheet for the drive after rebooting to
verify that the checkbox remains marked and that DMA is enabled. Note the following considerations for Windows 98/98 SE/Me and DMA: On a clean install, we found that Windows 98/98 SE/Me automatically
determines whether the chipset, drives, and BIOS support DMA. If so,
DMA is automatically enabled by default. On an upgrade install to a system running Windows 95 OSR1 or earlier,
we found that Windows 98/98 SE/Me Setup does not install DMA support,
even if all required elements are present. If this occurs, you can
enable DMA support by marking the DMA checkbox and restarting the
system. On an upgrade install to a system running Windows 95 OSR2 or higher,
we found that Windows 98/98 SE/Me Setup enables DMA only if Windows
95 had the Microsoft DMA drivers installed and enabled. If the
drivers were not installed, or if they were installed but DMA was not
enabled, Setup installs using PIO mode. Again, you can enable DMA
support manually by marking the DMA checkbox and restarting the
system. Installing Windows 98/98 SE/Me as an upgrade on a Windows 95 system
running the Intel BM-IDE driver causes all sorts of IDE problems. The
Intel BM-IDE driver version 3.01 has no uninstall option, but can be
uninstalled using the version 3.02 or higher Setup program. Before
upgrading to Windows 98/98 SE/Me, run BM-IDE version 3.02 or higher
and choose the deinstall option.
- Windows 2000/XP
-
Windows 2000 and Windows XP generally
manage DMA properly and automatically. During a fresh install,
Windows 2000/XP tests the ATA interface and the connected devices to
determine DMA compatibility. If the interface and all connected
devices are DMA-compatible, Windows 2000/XP enables DMA for that
interface. A problem may arise during an upgrade installation,
however. If the earlier OS version was not configured to use DMA,
Windows 2000/XP may not enable DMA even though the interface and
devices support it. To check DMA status on a Windows 2000/XP system,
and to enable DMA if necessary, take the following steps:
If you're not sure how your CD-ROM drive is
configured, restart the system and watch the BIOS boot screen to
determine whether the drive is connected to the Primary or Secondary
ATA channel and whether it is configured as Master or Slave. Right-click the My Computer icon and choose Properties. Click the
Hardware tab and then the Device Manager button to display the Device
Manager. Locate the IDE ATA/ATAPI Controllers entry and click the + icon to
expand the listing. There should be three lines visible, assuming
that both IDE channels are enabled. The first, which will be
something such as Intel® 82801BA Bus Master IDE
Controller, is for the ATA controller itself. The two remaining lines
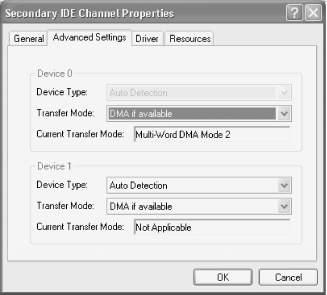
should be Primary IDE Channel and Secondary IDE Channel. Right-click the channel to which your CD-ROM drive is connected,
choose Properties, and then click the Advanced Settings tab to
display the IDE Channel Properties dialog. This dialog, shown in
Figure 10-9, has two sections, one for Device 0
(Master) and another for Device 1 (Slave). The listing for your
CD-ROM drive should display the DMA mode currently in use in the
Current Transfer Mode box. If it does, your drive is operating at
peak efficiency, and you can exit the dialog. For example, Figure 10-9 shows that the CD-ROM drive installed as the
master device on the secondary IDE channel is using Multi-Word DMA
Mode 2, which is the highest DMA standard it supports.
 If the Current Transfer Mode box for the CD-ROM drive lists
PIO Mode, check the setting for that device in
the Transfer Mode box. If the drop-down list in that box is set to
DMA if available, that means that Windows has determined that either
the interface or the drive (or both) do not support DMA. Exit the
dialog and resign yourself to running in PIO mode. If the Transfer
Mode box is set to PIO Only, use the drop-down list to change that
setting to DMA if available, save your changes, restart the system,
and redisplay that dialog. If the Current Transfer Mode box for the
drive now displays a DMA mode, the drive is now using DMA. If the box
still displays PIO Mode, Windows has determined that it is unsafe to
use DMA mode.
 |
Regardless of operating system, it's a bad idea to
configure a PIO-mode device to share an ATA channel with a
DMA-capable device. That's because ATA
doesn't allow mixing DMA mode and PIO mode on one
channel. If one device runs PIO mode, both must do so, which cripples
the DMA-capable device. In particular, it's a
horrible idea to put a PIO-only CD-ROM drive on the same channel as
an Ultra-DMA hard drive because that means the hard drive will run in
PIO mode, which cuts throughput by half or more and dramatically
increases CPU utilization. Put the PIO-only drive on its own channel,
alone or with another PIO-only device, or replace the drive with a
DMA-capable drive.
|
|
10.4.3 Installing and Configuring a SCSI CD-ROM Drive
Installing and configuring a
SCSI drive is somewhat more involved than installing and configuring
an ATAPI CD-ROM drive. Rather than attempting to provide step-by-step
instructions, which vary according to the specific drive and adapter,
we've chosen to illustrate a typical installation
using a Plextor UltraPlex 40Xmax drive and an Adaptec 2930 SCSI host
adapter, noting potential pitfalls along the way:
If you have not already done so, the first step is to install the
SCSI host adapter. To do so, power down the system, remove the cover,
and locate an unused PCI expansion slot that supports bus mastering.
Many recent systems support bus mastering on all available slots.
Older systems may support bus mastering on only some slots. In that
case, the slots capable of bus mastering are normally white or ivory,
and those not capable of bus mastering are brown or black. Remove the
slot cover for the selected slot, align the bus connector with the
slot, and press down firmly to seat the adapter. Use the screw that
secured the slot cover to secure the adapter. If you have a spare
drive activity indicator LED, you can connect it to J2 on the host
adapter (Pins 1 and 2 if the cable has only two positions). Both the Plextor drive and the Adaptec host adapter fully support
SCAM (SCSI Configured
Auto-Magically), a kind of Plug and Play for SCSI. Note
the following issues when working with SCAM: SCAM-compliant drives such as the Plextor
UltraPlex 40Xmax allow a SCAM-compliant host adapter such as the
Adaptec 2930 to set the drive's SCSI ID and
termination status automatically. SCAM-tolerant drives report their SCSI ID and
termination status to the adapter, but cannot reset SCSI ID or
termination status automatically. Instead, you must change jumpers or
switches on the drive manually to set SCSI ID and termination. Non-SCAM drives do not even report their current
settings to the adapter, let alone allow the adapter to reset them
automatically. When using non-SCAM devices, you must manually verify
settings and change them as necessary. Note that enabling SCAM on the
host adapter may cause your computer to hang if you connect a
non-SCAM drive because the adapter is unable to determine current
settings for the non-SCAM device. If this occurs, use the Adaptec
SCSISelect utility at boot time to disable SCAM on the adapter.
If you are installing a non-SCAM adapter and/or drive, you must set
SCSI IDs manually using the jumpers or switches on the adapter and
drive. If the adapter supports seven devices (plus the adapter
itself), the adapter is normally configured as SCSI ID 7 (the
highest-priority SCSI ID), leaving SCSI IDs 0 through 6 available for
drives. ID 0 is normally reserved for the boot hard disk, and ID 1
for a secondary hard disk. A CD-ROM drive should normally be assigned
to ID 2 or higher. If the host adapter is dedicated to devices other
than hard drives, it is acceptable to assign ID 0 or ID 1 to the
CD-ROM drive. If you are installing a non-SCAM adapter and/or drive, you may also
need to terminate the SCSI bus manually. Exactly two devices must be
terminated on each SCSI bus, and these devices must be those at each
end of the bus, as follows: If the SCSI adapter has only internal devices attached to it, the
adapter itself and the final device on the internal SCSI chain must
be terminated. If the SCSI adapter has only external devices attached to it, the
adapter itself and the final device on the external SCSI chain must
be terminated. If the SCSI adapter has both internal and external devices attached
to it, do not terminate the SCSI adapter itself.
Instead, terminate the final device attached to the internal chain
and the final device attached to the external chain.
Note that most recent SCSI host adapters, including the Adaptec 2930,
can automatically detect the presence of terminated SCSI devices on
the bus and automatically set their own termination status
accordingly. On Adaptec models, which we recommend exclusively, this
option can be enabled or disabled by using SCSISelect to set Host
Adapter Termination to AutoTerm, which is the default setting. Also
note that a few internal SCSI cables have a built-in terminator at
the end of the cable. If you use such a cable, make sure that
termination is disabled on all drives connected to that cable. Once you have resolved SCSI ID and termination issues and have the
drive physically installed, the next step is to connect the cables.
Most adapters are supplied with a standard two-device cable. If you
need to connect more than two drives, replace the cable before
proceeding. Otherwise, connect the cable to each drive, making sure
to align Pin 1 on the cable (indicated by a red stripe) with Pin 1 on
each device (indicated by a small number, triangle, or dot on the
connector). It doesn't matter which drive connects
to which cable position, so mix and match drives and cable positions
in whatever way makes it easiest to route the cable. Also connect the
power cable and the audio cable that links the CD-ROM drive to the
appropriate connector on your sound card or motherboard. After verifying all settings and connections, turn on any external
SCSI device(s) first, and then turn on the PC. Ordinarily, the system
should boot normally, but the SCSI CD-ROM drive may or may not be
recognized, depending on your operating system and other factors.
Before you configure the operating system to use the drive, however,
some systems may require that you complete one or both of the
following steps: - CMOS Setup
-
On most systems, the PCI bus assigns IRQs and port addresses
automatically. If your system requires setting PCI bus parameters
manually, do so during the first restart, using the system or
motherboard documentation for guidance.
- SCSI Setup
-
The SCSI BIOS displays its own splash screen while initializing,
which normally displays adapter and BIOS information and a list of
installed SCSI devices. Ordinarily, the default settings are fine,
but in some cases you may need to change settings to get the drive to
work at all or to optimize its performance. If this is the case for
your system, press whatever key sequence is needed to invoke the SCSI
Setup routine and make the necessary changes, as recommended by the
documentation for the host adapter and/or drive.
If either or both of these steps are needed, restart the system after
completing each.
10.4.4 General SCSI CD-ROM Troubleshooting
If you have installed your SCSI host
adapter and drive properly and have installed the requisite drivers
(described in the following sections) and your drive does not work,
check the following items before proceeding to other troubleshooting
steps:
Is the host adapter installed in a bus-mastering PCI slot? Verify
with the system or motherboard documentation that the chosen slot
supports bus mastering, or try another slot. Are all SCSI devices turned on, and were they turned on when you
booted the system? The SCSI adapter recognizes only devices that are
active when the system boots. If necessary, power down all SCSI
devices, turn off the computer, turn the SCSI devices back on, and
then turn the PC back on. Are all SCSI cables and power cables connected properly? Verify that
the Pin-1 orientation of all SCSI cables and devices is correct, and
that the power cable is fully seated in each SCSI drive. Does each SCSI device on the bus, including the host adapter, have a
unique SCSI ID, and is the bus terminated correctly? If not, correct
the ID assignments and/or termination and restart the system. If SCAM is enabled on your host adapter, are you certain that all
connected devices are SCAM-compliant (or at least SCAM-tolerant)? If
not, either replace the non-SCAM device, or disable SCAM on the
adapter and configure SCSI IDs and termination manually. Are you certain that you have installed all driver software that your
adapter and/or devices require?
10.4.5 Windows 9X/2000/XP SCSI Driver Installation and Troubleshooting
Ordinarily, Windows 9X/2000/XP
automatically detects installed SCSI host adapters and devices. If it
does not, first verify that the hardware is installed and configured
properly. If there is no apparent hardware problem, use the Add New
Hardware Wizard to force installation of the necessary drivers for
the new hardware.
To do so,
Open the Control Panel (Start  Settings
Control Panel) and double-click Add New Hardware.
Accept the default selection to allow Windows to attempt to
auto-detect the new hardware. Settings
Control Panel) and double-click Add New Hardware.
Accept the default selection to allow Windows to attempt to
auto-detect the new hardware. If Windows fails to detect the hardware, or locks up during the
detection process, restart the system, reinvoke the Add New Hardware
Wizard, and this time tell it that you want to select from a list. If you have a driver disk supplied by the manufacturer, choose the
Have Disk option at the appropriate point in the process. Otherwise, use the lists of manufacturers and models displayed by the
Add New Hardware Wizard to select the standard Windows drivers for
the installed devices. If no listed device exactly matches what is installed, you can
sometimes use the most closely similar device that is listed.
Ordinarily, the driver will load correctly and the device will be
recognized. If problems occur, take the following steps to resolve
them:
Open the Device Manager (Start Settings
Control Panel System
Device Manager). Locate the SCSI controller item
in the list, and click the plus sign (+) to its left to expand the
listing. Your SCSI host adapter should be listed. If it is not and
you have not yet installed drivers manually, exit the Device Manager
and install the drivers. If you have already attempted a manual
installation and are certain that all hardware is properly installed
and configured, contact the manufacturer or dealer for a replacement
device. If the device is listed, highlight it and click Properties to display
the General page of the property sheet for the device. The Device
Status section should state "This device is working
properly." If it does not, the most likely causes
are a resource conflict or a hardware problem. The Device usage
section contains a list of stored hardware profiles. Make sure that
the checkbox for current configuration (and any other configurations
for which you want to use this device) is marked. Click the Resources tab and examine the Conflicting Device list
section at the bottom, which should state "No
conflicts." If a conflicting device is listed,
reconfigure one or both devices to eliminate the conflict. After making any necessary changes to the General page and the
Resources page, save your changes and restart the system. The device
should be recognized properly. If it is not, contact the adapter
manufacturer's technical support.
10.4.6 Changing CD-ROM Drive Letter Assignments
By default, all
versions of Windows assign a CD-ROM drive the next available drive
letter following those for any local volumes. If you subsequently
install an additional hard disk or repartition your drive to create
additional volumes, the letter assigned to the CD-ROM drive may
change, which may confuse installed software that attempts to access
the CD-ROM drive as the old letter. You can avoid this
"musical chairs" reassignment of
CD-ROM drive letters by manually assigning the CD-ROM drive a drive
letter that is higher than the drive letter for any existing local or
network volume. We use R: for the CD-ROM drive by long-standing
habit, although there is something to be said for assigning it to Z.
To assign a different drive letter to the CD-ROM drive, proceed as
follows:
- Windows 95/98/98 SE/Me
-
Right-click the My Computer icon, choose Properties, and then click
the Device Manager tab. Double-click the CD-ROM drive to display its
Properties sheet, and then click the Settings tab. Use the spinner to
assign an unused drive letter to the CD-ROM drive and then restart
the system.
- Windows 2000/XP
-
If you have not already done so, right-click the Task Bar, choose
Properties, click the Advanced tab, and mark the Display
Administrative Tools checkbox in the Start Menu Settings pane. This
adds Administrative Tools to the Programs (2000) or All Programs (XP)
menu (it is also available in the Control Panel regardless of this
setting). From the Control Panel, choose Administrative Tools, and
then Computer Management. In Computer Management, expand the tree if
necessary to show items in the Storage branch. Click Disk Management,
locate your CD-ROM drive in the lower-right pane, right-click its
icon to display the context-sensitive menu, and choose the menu item
Change Drive Letter and Path. Assign an available drive letter to the
CD-ROM drive, save your changes, and exit. Once you accept the
changes, the new drive letter takes effect immediately.
If you change the drive letter assignment for a CD-ROM drive, do so
immediately after installing the drive or the operating system. If
you use that drive under its original letter to install software,
that software will later attempt to access the drive using the old
drive letter.
|