10.8. Terminal Services AdministrationYou can administer a Terminal Services machine from three points:
I covered the Terminal Services Licensing applet in the previous section. In this section, I'll cover the basic administrative functions that the Terminal Services Manager applet can perform, and then I will focus on some common tasks using the Terminal Services Configuration applet. 10.8.1. Terminal Services ManagerTerminal Services Manager (TSM ) is the focal point where all connections between client computers and Terminal Services machines come into view. Think of it as "mission control."
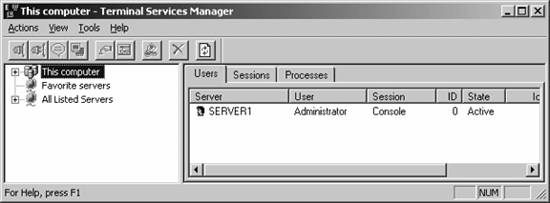
Figure 10-4 shows the basic TSM layout. Figure 10-4. The default Terminal Services Manager window
By default, TSM shows all Terminal Services servers in your domain. You can connect to all of them at once if you so choose, but TSM looks at only one server at a time by default. To find servers, use the following procedures:
Using TSM, you can perform a variety of network- and domain-wide session management functions. You can monitor a session, disconnect it, log it off, send messages to users, and take control of a session, among many other things. 10.8.1.1. Connecting to a sessionConnecting to another session on a server is a useful tool for an administrator working remotely, for example, to fix a problem with a user's configuration in Microsoft Office while the user is at lunch. You always can connect to any active session or to a session that is disconnected. You can also connect to a session that is logged on inside your current security context (meaning basically your username), or if you have the appropriate permissions (Full Control or User Access permissions over Terminal Services sessions), you can connect to any session. To connect to a session, follow these steps:
10.8.1.2. Disconnecting a sessionA session that is disconnected is unique, in that it continues to run on the server, but the actual network link between the client and the Terminal Services machine is severed. Using a disconnected session, a user can return to a previous session at any time by simply reestablishing the connection, alleviating the need for either logging off or logging on. The catch to this is that, of course, server resources are finite, and if all users leave their sessions disconnected, everybody's copy of Outlook is still receiving mail, and everyone's PowerPoint presentations are still open to be edited. But disconnecting a session is still a handy way to clear your screen to take off to lunch, knowing that when you come back your desktop will be as you left it. It's sometimes useful to disconnect a session when Remote Desktop fails to pick up your old connection. A user can disconnect any session of his own, and an administrator can disconnect any session over which he has Full Control rights. To disconnect a session, follow these steps:
You can select multiple sessions at a time in the right pane by pressing and holding the Ctrl key and clicking each session that you want to disconnect. 10.8.1.3. Logging off a sessionLogging off a session ends that particular user's session on a host, thereby making available to other users any RAM and CPU resources that the particular session was using. Users must then log on the next time they connect to the Terminal Services server. A user can log off any session of his own, and an administrator can log off any session over which he has Full Control rights. To log off a session, follow these steps:
Keep in mind that forcibly logging off users will result in data loss for those users, so always make them aware of any automatic logoffs before they happen. You also can log off a session by issuing the LOGOFF command, followed by the session ID or name (which you can find inside TSM), at the terminal server's command prompt. To log off session number 8, for example, use the following command:
logoff 8
10.8.1.4. Resetting a sessionWhen you reset a session, it forcibly terminates that session: programs are closed, open data is lost, and memory that those programs were occupying is immediately returned to the Terminal Services host. A user can reset any session of his or her own, and an administrator can reset any session over which he has Full Control rights. To reset a session, follow these steps:
You can select multiple sessions at a time in the right pane by pressing and holding the Ctrl key and clicking each session that you want to reset. You also can reset a session by issuing the RESET command, followed by the session ID or name, at the terminal server's command prompt. To reset session number 8, for example, use the following command:
reset session 8
10.8.1.5. Viewing session informationUsing TSM, you can get a wealth of detail about any particular session on a Terminal Services host machine, including the following:
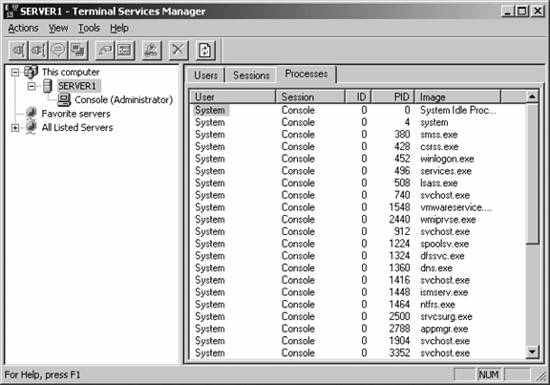
To view this information, find the session in the left pane of TSM, and select it. Then, to view currently running programs and services, click the Processes tab. You'll see a listing much like that found in the Windows Task Manager. On the Information tab in the same pane, you find a listing of the username, client name, data encryption level, originating computer, and more. But let's say you want information on all sessions, including their processes and logged-on users, for a particular Terminal Services machine, domain, or even an entire network. This is possible with TSM: simply select the machine, domain, or network in the left pane of TSM and use the Users, Sessions, or Processes tabs in the right pane to control the display of information. Figure 10-5 shows this in action. You also can view this information from the command line with the query process, query session, query termserver, and query user commands. These simple commands display a table or list of the desired information. Here is example output from the four commands:
    C:\>query process
    USERNAME SESSIONNAME ID PID IMAGE
    >administrator rdp-tcp#10 1 4900 rdpclip.exe
    >administrator rdp-tcp#10 1 4980 explorer.exe
    >administrator rdp-tcp#10 1 3488 ducontrol.exe
    >administrator rdp-tcp#10 1 5780 ctfmon.exe
    >administrator rdp-tcp#10 1 3308 sqlmangr.exe
    >administrator rdp-tcp#10 1 5056 cmd.exe
    >administrator rdp-tcp#10 1 3088 query.exe
    >administrator rdp-tcp#10 1 5844 qprocess.exe
    C:\>query session
    SESSIONNAME USERNAME ID STATE TYPE DEVICE
    console 0 Conn wdcon
    rdp-tcp 65536 Listen rdpwd
    >rdp-tcp#10 administrator 1 Active rdpwd
    C:\>query user
    USERNAME SESSIONNAME ID STATE IDLE TIME LOGON
    >administrator rdp-tcp#10 1 Active .
    7/15/2004 5:49 PM
    C:\>query termserver
    NETWORK NETWORK
    mercury hasselltech.local
Figure 10-5. Viewing information on multiple sessions in TSM
10.8.1.6. Sending a message to a userSometimes it's necessary to send a message to all users logged on to a specific host, whether to mention that there might be downtime that evening, or that a virus or worm (God forbid) has invaded the Terminal Services machine and it needs to be shut down immediately. To send a message to a user, follow these steps:
A notification will be sent to the appropriate people. A sample is shown in Figure 10-6. Figure 10-6. User messaging with Terminal Services
You also can send a message via the command line, which might be helpful if you are planning on scripting a message transmission that is triggered by a certain event. The MSG command is used to send these messages; some examples are presented here:
For more information on the switches and arguments available with the MSG command, type MSG /? at any command prompt. 10.8.1.7. Taking control of a sessionHave you ever been on a troubleshooting call that was an intensely frustrating exercise in walking a user through a procedure in Excel or Access? What if the user could watch you perform the actions on his screen, and what if you could show the user the steps without leaving your desk? If the user has a session on a Terminal Services machine, you as the administrator can take control of his session, giving you full access to whatever the user's screen displays. The user can watch whatever you do in his session, making the tool wonderful for quick problem solving. The user also can control his session while you have control so that both sides can interact.
To take control of a particular session, follow these steps:
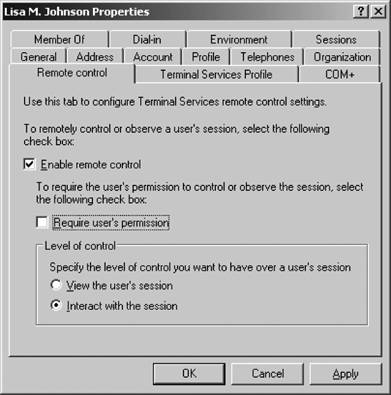
It's possible to turn off the aforementioned user confirmation requirement through the user's properties inside Active Directory Users and Computers. On the Remote Control tab, uncheck the Require User's Permission checkbox, as shown in Figure 10-7. Figure 10-7. Disabling the user notification requirement for remote control
Later in this chapter, I will discuss a way to turn this notification on and off on a per-server basis. You also can remotely control a user's session from the command line using the SHADOW command. You must know the session's name or identification number. For example, to connect to session 3 on the current server, issue the following command:
shadow 3
To connect to session 2 on server WTS2, and to have the SHADOW utility tell you exactly what it does, issue the following command:
shadow 2 /server:WTS2 /v
10.8.2. Terminal Services ConfigurationThe Terminal Services Configuration applet provides a way to configure settings that are relevant to a specific server. When you open Terminal Services Configuration, you'll note that the tree in the left pane of the console has two nodes: Connections and Server Settings. Let's focus on the Server Settings section in this part of the chapter. When you select Server Settings, you're provided with either six or seven options in the right pane, depending on whether your terminal server machine is a member of a cluster. These options, and their intended purpose, are described here:
The following subsections will take you through common administrative tasks using the Connections node inside Terminal Services Configuration. 10.8.2.1. Creating a new connection listenerUse the Terminal Services Configuration applet to create a new Terminal Services connection by following these steps:
Windows permits only one RDP-based connection per network card in the machine running Terminal Services. Usually, administrators find that the preconfigured connection created when Terminal Services is installed is really the only one they need. However, if you need more RDP connections, you'll need to install an additional network adapter for each connection needed. 10.8.2.2. Restricting Terminal Services connectionsYou can restrict the total number of RDP connections to any given server, which can be helpful if you have bandwidth problems on your network or your Terminal Services server machine has limited hardware resources. To restrict the total number of RDP connections to a server through the Terminal Services Configuration applet, follow these steps:
To do so using GP, which overrides and takes precedence over the settings specified in Terminal Services Configuration, follow the steps described next.
You might want to restrict the number of Terminal Services sessions by server to improve performance and decrease load. This technique works especially well when you have a terminal server farm consisting of machines of various capabilities and configurations. You can adjust each server to the optimal number of connections to ensure a consistent response time across the farm for your users. RDP connections, by default, are configured to allow an unlimited number of sessions on each server. 10.8.2.3. Encryption levelsTerminal Services supports multiple levels of encryption to secure communications between the client and the server. To change these levels through Terminal Services Configuration, follow these steps:
You can also change the TS encryption level using Group Policy:
Use the following guide to determine which security setting is best for your environment:
It's also important to note that the aforementioned GP procedure will work for local security policy configurations. However, if you have a domain environment and want to push this policy onto an existing domain or organizational unit, you need to connect to the domain controller using an account with administrator rights. Then you need to make the change through the Group Policy Management Console. Also be aware that data sent from the server to the client (and not vice versa) is not encrypted. 10.8.2.4. Remote control permissionsYou can adjust how administrators will be able to "shadow" a Terminal Services session. You can restrict a user to viewing a session only, or allow him or her to have full control of the keyboard and mouse. To adjust these settings through Terminal Services Configuration, follow these steps:
To do so using GP, follow these steps:
You should thoroughly test any changes you make to GP settings before applying them to users or computers. Use the RSoP tool to test new policy settings and confirm they will be applied as you intend. Chapter 6 contains detailed discussions and procedures for using this tool. The aforementioned GP procedure also will work for local system policies. If you're using an Active Directory-based domain, though, and you want to push this policy onto an existing domain or organizational unit, you need to connect to the domain controller using an account with administrator rights and then make the change through the Group Policy Management Console. Policies in effect are applied to and therefore are in full force for every client that connects to the terminal server. 10.8.2.5. Connecting to drives and printersTerminal Services enables you to preserve mapped drives, mapped printers, and associated settings between sessions so that users don't have to recreate them each time they log on. To adjust the settings for this feature through Terminal Services Configuration, follow these steps:
To do so through GP, follow these steps:
These settings affect all clients that use the connection to log on to a terminal server. If you want to define settings on a per-user basis, use Terminal Services Group Policies or the Terminal Services Extension to Local Users and Groups. Again, you can use these settings when configuring local security policy, but if you want to push them out throughout a domain, you need to change your domain's security policy through the Group Policy Management Console. 10.8.2.6. Session device mappingOne of the neat features of RDP is the ability to redirect local drives and local printers to your remote session so that through the remote computer's user interface you can still access the drives and printers on your personal machine. This is great when using hosted applications because Save As... and Open... dialog boxes work the same way as users expect. To adjust the settings for this feature through Terminal Services Configuration, follow these steps:
To do so through GP, follow these steps:
As before, you can use these settings when configuring local security policy. However, if you want to push them out throughout a domain, you need to modify your domain's security policy through the Group Policy Management Console. 10.8.2.7. Default Terminal Services permissionsYou might want to give permission for specific users and groups to use Terminal Services. You can accomplish this using the Terminal Services Configuration applet. The procedure is much like granting and revoking permissions on files and folders. To do so, follow these steps:
When the name is located, click OK. The name now appears in the Group or User Names list on the Permissions tab. If you want to change the default permissions applied to users and groups that can access Terminal Services, follow these steps to use the Terminal Services Configuration applet to modify the default Terminal Services permissions assigned to users:
Follow this procedure to remove a group from the list of users authorized to access Terminal Services:
10.8.2.8. Ensuring RPC-based securityIf you want to secure Terminal Services-based RPC traffic to and from the server, use Group Policies to accomplish this. Simply follow these steps:
You use the RPC interface to manage and configure Terminal Services. By setting the Secure Server (Require Security) option to Enabled, only RPC clients that support secure transactions are allowed to communicate with the server. If the setting is disabled, the terminal servers will always request a secure channel, but will allow connections that are unsecured if the client doesn't support secure transactions. The default status for this setting is not configured, which allows for unsecured transactions. |