11.3. Certificate ServicesCertificates in Windows Server 2003 are primarily used for authentication purposesto verify that the sender (and sometimes the receiver) of a message is indeed who that person says he is. Certificates are part of the broad-reaching public key infrastructure concept which mainly serves as a standard that manufacturers and developers can use to ensure their certificate-based authentication mechanism can interoperate with other manufacturers' equipment and software. PKI is important in a couple of key scenarios:
Let's dig a little deeper into PKI before getting specifically into its implementation within Windows Server 2003. 11.3.1. KeysThere are two main types of keys that you'll hear when people speak or write about PKIpublic keys and private keys . In PKI, keys are used in a scheme called asymmetric encryption, wherein one key is used to encrypt a message or some data and another, completely separate key is used to decrypt it. Such keys are generated by a computer and are based on a very long sequence of numbers that would be hard for an automated cracking program to guess. While the keys themselves are identical in format (but not content), users choose which one they will use to represent their public key; the remaining key becomes their private key. Messages can then be encrypted with a user's public key, and on the other side the associated private keythe only key that would workwould be used to decrypt it. (The process also works in reverse: you can encrypt something with a private key, and in that case only the public key can decrypt it.) Keys are used with hashing algorithms that basically take an entire message or stream of data and condense it into a few bytes of data; this remainder is called a digest. For example, if I send an email and want to sign that email (thus authenticating that I indeed wrote the email myself) with my private key, the email client will assign a digest value to my message of, say, 1167. Note that the hashing function is one-way, in that you will always get the same digest coming out of the hashing function assuming you put the same data in, but from the digest you couldn't in any practical way figure out how the digest was computedthat is, you couldn't determine the formula or algorithm the hashing function was using. This is a cornerstone of PKI and encryption. To further secure the process, before the email is sent, the client program encrypts the digest, and then sends the message on with this encrypted digest embedded inside. Let's dig a little further, taking the email example and moving to the receiver's end. The email client wants to ensure that the signature I put on the email was valid. So the receiving email client will run through its own hashing function, and it comes up with 1167 as the digest value. But the receiving client doesn't know what the digest value sent with the message was since it was encrypted. So it uses my public keysomething freely available that I can give out through a number of avenues, which I'll talk about in just a bitto decrypt the digest that was sent with the message. Then it discovers that that digest, with a value of 1167, matches its version of the digest, which is also 1167. The security and veracity of this authentication comes from this: if the message has been tampered with while in transit over the wire, the receiver's email client would have computed a different digest value from its hashing function (remember, different inputs in almost all cases means different digests). And since only the receiver's copy of my public key can decrypt something I've encrypted with my private key, the receiver can reasonably assume the digest is authentic and no one is faking him or her out. So public keys and private keys, which are methods for asymmetric encryption, are useful for authenticating certain pieces of data. But making an entire communication series secure, and not just encrypting an individual a digest, is a bit more complicated. For example, when you use the secure socket layer (SSL) method of encryption as is primarily used between web servers, for the majority of the session you're actually engaging in symmetric encryption, which means that the same key is used at both ends of the transaction to encrypt and decrypt data. There's no public and private key in symmetric encryption: both sides agree on one key for use during that particular session only. The reasoning behind this lies primarily in the fact that symmetric encryption is significantly less processor-intensive than asymmetric encryption. But how do the machines on both ends of the transmission agree on a key? After all, if you exchange the key in clear, unencrypted text before you begin encrypting things, it that really defeats the purpose of using encryption in the first place. The solution is through the use of asymmetric encryption to get a secure key exchange going. Here's how it works: one machine will have both a public key, which it will give out to anyone who asks for it, and a private key, which it of course keeps close to its chest. Let's assume the other machine is running a Web browser, and as part of its preparation to start conducting this secure session, has obtained the public key from the first machine. The browser then suggests a session keythe one both machines will use for that session onlyand encrypts it with the public key of the first machine and sends it on. The first machine decrypts that message with its private key, which no one else knows, and finds the session key. Note that the key has never been transmitted across the wire in clear text. Now that both machines know the key, they can begin using symmetric encryption and drop the public/private key scheme. This process happens, of course, in mere milliseconds, and is known as a key exchange. 11.3.2. CertificatesThere's a final element to this puzzle, and it addresses the problem of distributing and verifying the authenticity of public keys. I can give out public keys to anyone who asks, but the recipient could be easily duped into accepting a public key, supposedly from me, that was actually created by a nefarious person or group. Certificates themselves come into play in here: certificates are essentially a document containing someone's public key, some additional verification information, which is then signed by a trusted third party. This trusted third party, called a certificate authority, takes my public key, asks for some personally identifiable information from me (like a business license, state-issued identification, or some other legitimate documentation), assigns an expiration date, attaches their identifying information, and then puts the whole thing through a hashing function to compute a digest. The CA then uses its private key to sign that digest, and then it wraps all of this information into a convenient single "document," and that's the certificate. Recall that the certificate authority must have a public key if they have a private key, and this public key has been distributed about in various forms. For example, VeriSign, a commercial certificate authority, has its public keys installed in every modern web browser on the market today. There are several different types of certificates that can be used in different scenarios. Consider some of them:
11.3.2.1. Certificate StoresThese certificates need to be stored someplace on your system. In Windows client operating systems and Windows Server 2003, certificates are placed into a "certificate store," which is actually a part of the Registry. You will typically find both a user and a computer certificate store on any given machine, and you can add certificates to either store fairly easily simply by opening the certificate (either as a file or from a prompt your Web browser gives you when it encounters an unknown certificate) and telling Windows to place the certificate in the appropriate store. Note that if you have roaming profiles enabled, your user certificate store will roam with you. Certificates placed in the computer certificate store are available to any user who may log on to the machine. There's also an MMC snap-in that makes it a bit easier to manage certificates and the certificate stores on Windows machines. You'll need to set up a custom console to see the snap-in, though, as it's not viewable by default with any of the console shipped with Windows Server 2003. To do so:
You've now created a custom MMC. It should look something like what you see in Figure 11-21. Figure 11-21. Viewing the user and computer certificate stores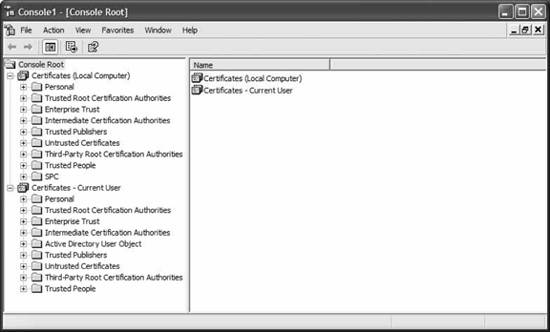
Some folders in this console of which to take note:
Aside from its use to peek inside a machine's knowledge of certificates and organizational trusts, this MMC console will probably see little use from you, since this type of infrastructure tends to work fairly well for most uses. However, things begin to get less clear when you need to begin trusting other CAs besides those whose certificates are preloaded with Windows. Trust, at least in this context, is somewhat of a complex issue, but the essence of it when dealing with PKI is the installation of a CA's certificate in a certificate store. Essentially, when you trust the decisions and the verification process of a CA, you are, by extension, trusting any certificate signed by that CA. By placing that CA's certificate in a certificate store, any valid certificate that comes along for inspection that is signed by that CA will be accepted. So if you place InstantCert.net's CA certificate in your store, you will accept at face value any validly formed certificate that comes your way that was signed by InstantCert.net's CA machines. The same works for your business partner: if you need to trust certificates signed by a partner's internal CA, then you would place that CA's certificate into the certificate store. But what if your company needs to issue certificates internally to protect web servers or other machines that may pass sensitive information between themselves? What if you do business in a federated fashion with another firm and need to issue certificates to them? 11.3.3. Creating a Certificate Authority in Windows Server 2003The answer is to run your own CA. The prospect sounds more formidable than the process actually is. You'll find that certificates are a lot easier to request and distribute internally if you use Certificate Services' built-in web request feature; to enable this, you'll need to install IIS on your server and enable ASP.NET, which is turned off by default. Configure this prerequisite first through the Manage Your Server Wizard; see Chapter 8 for details. Once that's done, let's step through the procedure to actually get Certificate Services installed:
The CA is now up and running, and we can now request a certificate from it for a machine. In this example, my machine, JH-WNXP-AUX, is going to ask for a plain server authentication certificate from the CA JH-W2K3-TST. First, I'll go to the Certificate Services web site at http://jh-w2k3-tst/certsrv and be greeted with the welcome screen shown in Figure 11-25. I'll click the Request a Certificate link, and then since I don't want an email or web page certificate, I need to ask for the advanced certificate request page. This selection page is shown in Figure 11-26. Next, I'll tell the wizard to create and submit a request to this CA and not another CA, as shown in Figure 11-27. Figure 11-24. The Certificate Database Settings screen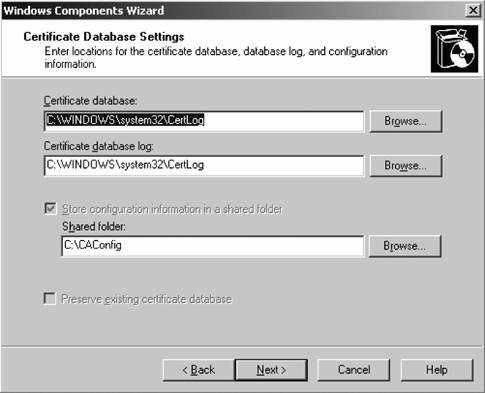
Figure 11-25. The Microsoft Certificate Services welcome screen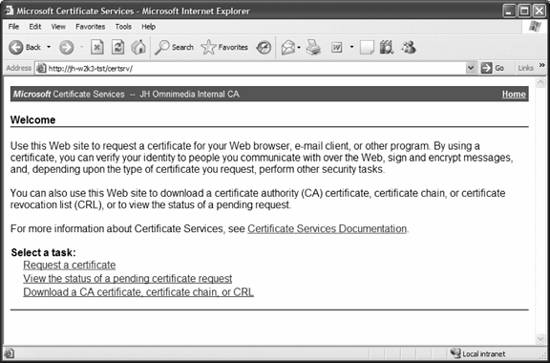
Figure 11-26. The Request a Certificate page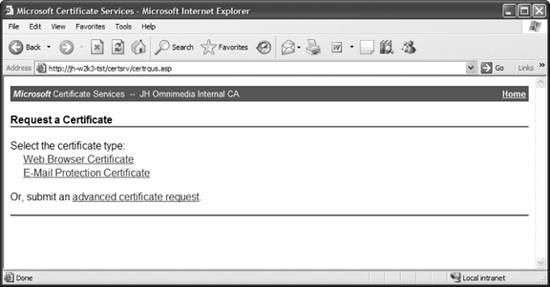
Figure 11-27. Telling the wizard to use this CA for requests and issuance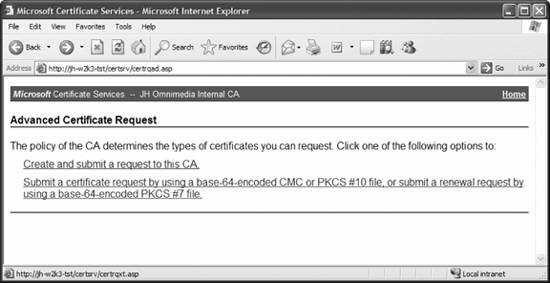
The Advanced Certificate Request screen appears. Since this is a long screen, I've captured the page in halves. Figure 11-28 shows the top half, and Figure 11-29 shows the bottom half. I'll fill in the identifying information part of the page with my personal information, select Server Authentication Certificate from the Type of Certificate Needed list, and then accept the defaultsexcept that I'll check the option to store the certificate in my local store. (If you wanted only a signing key, or only an encryption [exchange] key, you can select the appropriate option in the Key Usage set of radio buttons.) Figure 11-28. The Advanced Certificate Request screen (top half)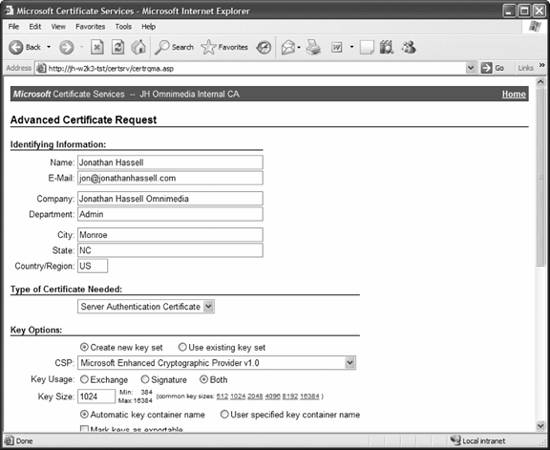
Once everything looks good, I'll click Submit, and I'll be rewarded with the message that the administrator of the CA needs to approve my request and that I can come back later to pick up the certificate. But that's only after a friendly security reminder, shown in Figure 11-30, to which I can safely say Yes. So now that the key request has been submitted, as the administrator I need to issue the certificate that is currently pending. So I'll go to the console of the CA and load the Certification Authority snap-in from the Administrative Tools menu, and then click the Pending Requests folder in the left pane. The screen looks like that shown in Figure 11-31. To issue the certificate, I'll simply right-click on the request, and from the All Tasks menu, choose Issue. Now, back at the machine that's requesting the certificate, I'll return to the CA's web site and click View the status of a pending certificate. The next screen, shown in Figure 11-32, lists the requests I've made. Figure 11-29. The Advanced Certificate Request screen (bottom half)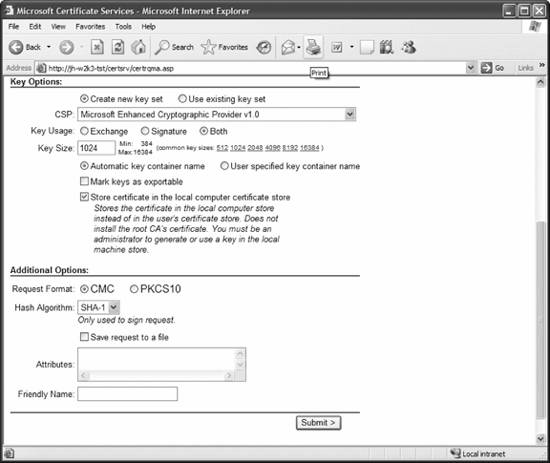
Figure 11-30. Finishing the certificate request process
I'll click the link, and then a page is returned with a link to the newly issued certificate. I can click on that link and Internet Explorer will automatically download that certificate into my store. You can see this in Figure 11-33. And now the certificate request process is finished. Note for your future reference that it's even easier for users to access this web site and download email or web page certificates since they won't need to submit an advanced certificate request for that; this example was the most complex certificate request to demonstrate. Figure 11-31. Pending requests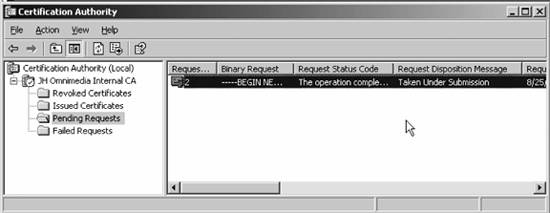
Figure 11-32. Viewing the status of a pending certificate request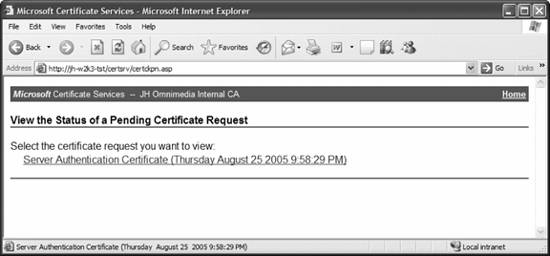
11.3.4. Implications to Specific ServicesUp to this point, you've taken a tour of PKI in general and certificate services in Windows Server 2003 in particular. In this section, I'll take a look at how this knowledge applies and relates to individual functions within the product. 11.3.4.1. IPsecUsing certificates with IPsec is easyyou'll first need to obtain the certificates from the CA. In the web interface that I just demonstrated, submit an advanced request, and then choose either an IPsec certificate or a client authentication certificate. Make sure to choose the option to store the certificate in the local store. You'll also need to ensure that all systems communicating through IPsec authenticated using certificates are using certificates signed by the same CA. Figure 11-33. Installing the new certificate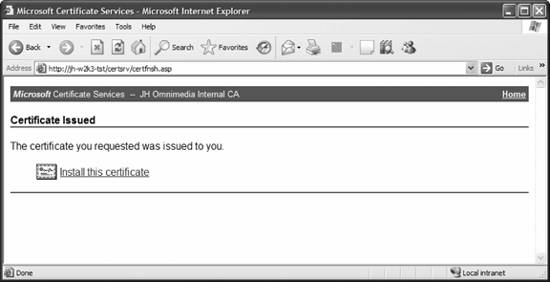
It's recommended that you set up IPsec first using another, simpler form of authentication. There's ample guidance in the next section of this chapter. After you've gotten all the systems talking to each other, then you can elect to use certificatesit's a lot easier once the initial troubleshooting is over. 11.3.4.2. EFSRemember from Chapter 3 that recovery agent certificates can allow another user to decrypt files, in an emergency situation, that a separate user encrypted. You can get this certificate from the web interface simply by submitting an advanced request and selecting the Recovery Agent option from the certificate type list. Once you've downloaded the certificate, you'll need to install it on the machine where you need to decrypt files. Load the Local Security Policy applet from Administrative Tools, and navigate to the Public Key Policies and Encrypting File System folder. Right-click on that folder, and from the context menu, choose Add Data Recovery Agent, and follow the simple wizard from there. Of course, the usual caveat applies: the target machine must trust certificates signed by your CA. 11.3.5. Certificate RevocationThere may come a time when it's necessary to make a certificate null and voidfor instance, in the event a notebook computer is stolen, or you've misidentified the credentials of someone after you've issued a certificate for him or her. This isn't difficult to do, it just requires a short trip to the Certification Authority MMC console on one of your CAs. Once that's loaded:
You'll then see the certificate you selected in the Revoked Certificates folder. To the CA, this certificate is now invalid, and the CA adds the certificate to its CRL (recall this list that I discussed earlier in the section). But if you have more than one CA, you'll probably find that they're not instantly aware of the certificate being revoked. By default, a Certificate Services-based CA will issue a new CRL weekly, and CAs lower down on the hierarchy chain will generally refresh their copy of a higher CA's CRL when the old one expires.
|