12.2. Server Clustering
If an NLB cluster is too limited in functionality for you, you should investigate a true server cluster. In a true server cluster, a group of machines have a single identity and work in tandem to manage and, in the event of failure, migrate applications away from problematic nodes and onto functional nodes. The nodes of the cluster use a common, shared resource database and log storage facility provided by a physical storage device that is located on a hardware bus shared by all members of the cluster.
 | The shared data facility does not support IDE disks, software RAID (including Windows-based dynamic RAID), dynamic disks or volumes, the EFS, mounted volumes and reparse points, or remote storage devices such as tape backup drives. |
|
Three types of clusters are supported by Windows Server 2003 in the Enterprise and Datacenter editions of the product: single node clusters, which are useful in test and laboratory environments to see if applications and resources function in the manner intended but do not have any sort of fault-tolerant functionality; single quorum device clusters, which are the most common and most functional type of cluster used in production because of their multiple nodes; and majority node set clusters, which function as a cluster but without a shared physical storage device, something required of the other two types. Majority node set clusters are useful if you do not have a SCSI-based SAN or if the members of a cluster are spread out over several different sites, making a shared storage bus unfeasible. The Enterprise Edition supports up to four cluster nodes; the Datacenter Edition supports up to eight.
Clusters manage failure using failover and failback policies (that is, unless you are using a single node cluster). Failover policies dictate the behavior of cluster resources
when a failure occurswhich nodes
the failed resources can migrate to, the timing of a failover after the failure, and other properties. A failback policy specifies what will happen when the failed node comes back online again. How quickly should the migrated resources and applications be returned to the original node? Should the migrated objects stay at their new home? Should the repaired node be ignored? You can specify all of this behavior through policies.
12.2.1. Cluster Terminology
A few specific terms have special meanings when used in the context of clustering. They include the following:
Networks Networks, also called interconnects, are the ways in which clusters
communicate with other members (nodes) of the cluster and the public network. The network is the most common point of failure in cluster nodes; always make network cards redundant in a true server cluster.
Nodes Nodes are the actual members of the cluster. The clustering service supports only member nodes running Windows Server 2003 Enterprise Edition or Datacenter Edition. Other requirements include the TCP/IP protocol, connection to a shared storage device, and at least one interconnect to other nodes.
Resources Resources are simply anything that can be managed by the cluster service and that the cluster can use to provide a service to clients. Resources can be logical or physical and can represent real devices, network services, or file system objects. A special type of physical disk resource called the quorum disk provides a place for the cluster service to store recovery logs and its own database. I'll provide a list of some resources in the next section.
Groups Resources can be collected into resource groups
, which are simply units by which failover and failback policy can be specified. A group's resources all fail over and fail back according to a policy applied to the group, and all the resources move to other nodes together upon a failure.
Quorum A quorum is the shared storage facility that keeps the cluster resource database and logs. As noted earlier in this section, this needs to be a SCSI-based real drive with no special software features.
12.2.2. Types of Resources
A variety of resources are supported out of the box by the clustering service in Windows Server 2003. They include the following:
DHCP This type of resource manages the DHCP service, which can be used in a cluster to assure availability to client computers. The DHCP database must reside on the shared cluster storage device, otherwise known as the quorum disk.
File Share Shares on servers can be made redundant and fault-tolerant aside from using the Dfs service (covered in Chapter 3) by using the File Share resource inside a cluster. You can put shared files and folders into a cluster as a standard file share with only one level of folder visibility, as a shared subfolder system with the root folder and all immediate subfolders shared with distinct names, or as a standalone Dfs root.
 | Fault-tolerant Dfs roots cannot be placed within a cluster. |
|
Generic Application Applications that are not cluster-aware (meaning they don't have their own fault tolerance features that can hook into the cluster service) can be managed within a cluster using the Generic Application resource. Applications managed in this way must be able store any data they create in a custom location, use TCP/IP to connect clients, and be able to receive clients attempting to reconnect in the event of a failure. You can install a cluster-unaware application onto the shared cluster storage device; that way, you need to install the program only once and then the entire cluster can use it.
Generic Script This resource type is used to manage operating system scripts. You can cluster login scripts and account provisioning scripts, for example, if you regularly use those functions and need their continued availability even in the event of a machine failure. Hotmail's account provisioning functions, for instance, are a good fit for this feature, so users can sign up for the service at all hours of the day.
Generic Service You can manage Windows Server 2003 core services, if you require them to be highly available, using the Generic Service resource type. Only the bundled services are supported.
IP Address The IP Address resource manages a static, dedicated IP address assigned to a cluster.
Local Quorum This type of resource is used to represent the disk shared by the cluster for activity logs and the cluster resource database. Local quorums do not have failover capabilities.
Majority Node Set The Majority Node Set resource represents cluster configurations that don't reside on a quorum disk. Because there is no quorum disk, particularly in instances where the nodes of a cluster are in separate, geographically distinct sites, there needs to be a mechanism by which the cluster nodes can stay updated on the cluster configuration and the logs each node creates. Only one Majority Node Set resource can be present within each cluster as a whole. With a majority node set, you need 1/2n + 1 functioning nodes for the cluster to be online, so if you have four members of the cluster, three must be functioning.
Network Name The Network Name resource represents the shared DNS or NetBIOS name of the cluster, an application, or a virtual server contained within the cluster.
Physical Disk Physical Disk resources manage storage devices that are shared to all cluster members. The drive letter assigned to the physical device is the same on all cluster nodes. The Physical Disk Resource is required by default for all cluster types except the Majority Node Set.
Print Spooler Print services can be clustered using the Print Spooler resource. This represents printers attached directly to the network, not printers attached directly to a cluster node's ports. Printers that are clustered appear normally to clients, but in the event that one node fails, print jobs on that node will be moved to another, functional node and then restarted. Clients that are sending print jobs to the queue when a failure occurs will be notified of the failure and asked to resubmit their print jobs.
Volume Shadow Copy Service Task This resource type is used to create shadow copy jobs in the Scheduled Task folder on the node that currently owns the specified resource group hosting that resource. You can use this resource only to provide fault tolerance for the shadow copy process.
WINS The WINS resource type is associated with the Windows Internet Naming Service, which maps NetBIOS computer names to IP addresses. To use WINS and make it a clustered service, the WINS database needs to reside on the quorum disk.
12.2.3. Planning a Cluster Setup
Setting up a server cluster can be tricky, but you can take a lot of the guesswork out of the process by having a clear plan of exactly what goals you are attempting to accomplish by having a cluster. Are you interested in achieving fault tolerance and load balancing at the same time? Do you not care about balancing load but want your focus to be entirely on providing five-nines service? Or would you like to provide only critical fault tolerance and thereby reduce the expense involved in creating and deploying the cluster?
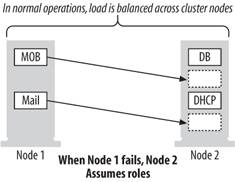
If you are interested in a balance between load balancing and high availability, you allow applications and resources in the cluster to "fail over," or migrate, to other nodes in the cluster in the event of a failure. The benefit is that they continue to operate and are accessible to clients, but they also increase the load among the remaining, functioning nodes of the cluster. This load can cause cascading failuresas nodes continually fail, the load on the remaining nodes increases to the point where their hardware or software is unable to handle the load, causing those nodes to fail, and the process continues until all nodes are deadand that eventuality really makes your fault-tolerant cluster immaterial. The moral here is that you need to examine your application, and plan each node appropriately to handle an average load plus an "emergency reserve" that can handle increased loads in the event of failure. You also should have policies and procedures to manage loads quickly when nodes fail. This setup is shown in Figure 12-11.
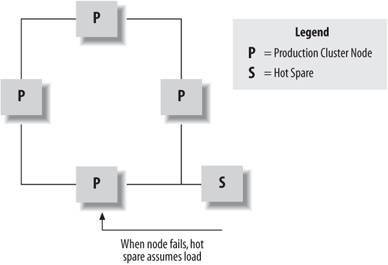
If your be-all and end-all goal is true high availability, consider running a cluster member as a hot spare, ready to take over operations if a node fails. In this case, you would specify that if you had n cluster nodes, the applications and resources in the cluster should run on n-1 nodes. Then, configure the one remaining node to be idle. In this fashion, when failures occur the applications will migrate to the idle node and continue functioning. A nice feature is that your hot spare node can change, meaning there's not necessarily a need to migrate failed-over processes to the previously failed node when it comes back upit can remain idle as the new hot spare. This reduces your management responsibility a bit. This setup is shown in Figure 12-12.
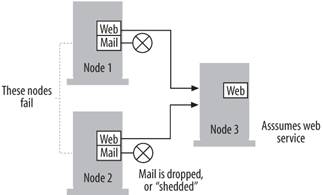
Also consider a load-shedding setup. In load shedding, you specify a certain set of resources or applications as "critical" and those are automatically failed over when one of your cluster nodes breaks. However, you also specify another set of applications and resources as "non-critical." These do not fail over. This type of setup helps prevent cascading failures when load is migrated between cluster nodes because you shed some of the processing time requirements in allowing non-critical applications and resources to simply fail. Once repairs have been made to the nonfunctional cluster node, you can bring up the non-critical applications and resources and the situation will return to normal. This setup is shown in Figure 12-13.
12.2.4. Creating a True Server Cluster
With the background out of the way, it's time to create your first server cluster. Creating a new cluster involves inspecting the potential members of the cluster to ensure they meet a solid baseline configuration and then starting the cluster service on each so that resources are managed across the machines and not individually on each machine.
To create a true server cluster, follow these steps.
From the Administrative Tools folder, open the Cluster Administrator console. The Open Connection to Cluster screen will appear automatically. From the drop-down list at the top of the box, select Create New Cluster. Click OK. The New Server Cluster Wizard starts. Click Next from the introductory screen, and the Cluster Name and Domain screen appears. Enter the domain name and the name for the new cluster. Click Next to continue. The Select Computer screen appears. Here, type in the name of the computer which will become the first member of the new cluster. Click Next. The Analyzing Configuration screen will appear, as shown in Figure 12-14. Here, exhaustive tests will be done and the current configuration of the computer you identified in step 4 of this section will be examined for potential problems or showstoppers to its entrance into a cluster. The resulting progress bar will turn either green (indicating that no show-stopping errors were found) or red (indicating problems that must be rectified before continuing). You can examine the list in the middle of the screen for a brief explanation of any item encountered, or select the item and then click the Details button for a more thorough explanation. Correct any problems, and then click Next. The IP Address page will appear. On this screen, enter the IP address that other computers will use to address the cluster as a whole. Click Next when you've entered an address. The Cluster Service Account page appears. Here, specify either an existing account or a new account which will be given local administrator privileges over all machines that are members of the new cluster. Click Next when you've specified an account. The Proposed Cluster Configuration screen appears next which summarizes the choices you've made in the wizard. Confirm the selections you've entered, and then click Next to build the cluster and add the first node to the new cluster. Once the cluster has finished building, click Finish to end the wizard.
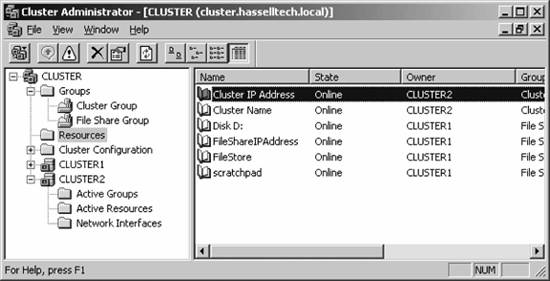
The new cluster is active, and the first member has been added to it. When the wizard exits, you're dumped back into the Cluster Administrator console, this time populated with management options and the new cluster node. A sample console is shown in Figure 12-15.
12.2.5. Adding a Node to an Existing Cluster
For a single-node cluster, you can leave your settings alone and the resulting cluster will function just fine. You can use this configuration in a testing environment, but it really provides no fault-tolerant functionality in production use. To get a more dependable, reliable solution, you need to move to single quorum device clusters and add a new node to the cluster. Then, resources and applications can fail over to other nodes in the cluster.
To add a new node to an existing cluster, follow these steps:
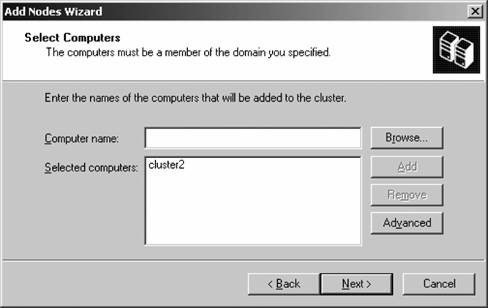
Within the Cluster Administrator console running on any current node of the cluster, connect to the cluster and then right-click the cluster name in the left pane. From the New menu, select Node. The Add Nodes Wizard appears; click past the introductory screen and the Select Computers screen appears, as shown in Figure 12-16. Here, enter the names of any computers you'd like to join to the current cluster. Click Next when you're finished.
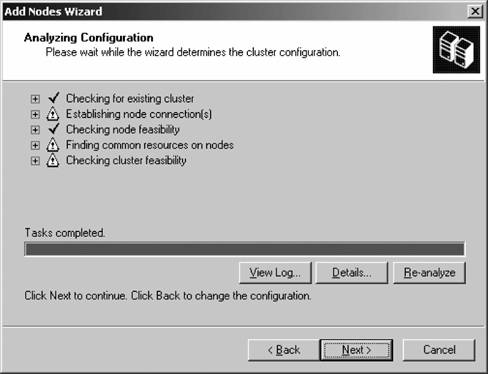
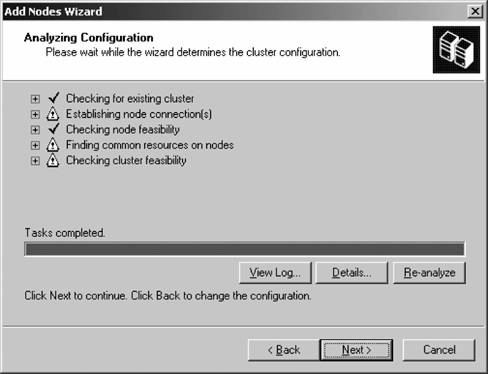
The Analyzing Configuration screen will appear, as shown in Figure 12-17. Here, exhaustive tests will be done and the current configuration of the computer you identified in the previous step will be examined for potential problems or showstoppers to its entrance into a cluster. The resulting progress bar will turn either green (indicating no showstopping errors were found) or red (indicating problems that must be rectified before continuing). You can examine the list in the middle of the screen for a brief explanation of any item encountered, or select the item and then click the Details button for a more thorough explanation. Correct any problems, and then click Next. The Cluster Service Account page appears next. Here, specify either an existing account or a new account which will be given local administrator privileges over the new member of the cluster. Click Next when you've specified an account.
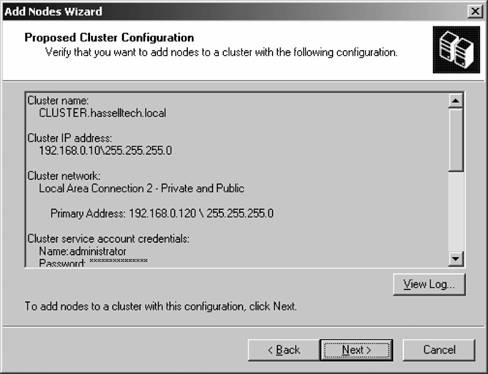
The Proposed Cluster Configuration screen appears next, as shown in Figure 12-18, which summarizes the choices you've made in the wizard. Confirm the selections you've entered, and then click Next to add the node to the existing cluster. Once the cluster has finished adding
the new node, click Finish to end the wizard.
The machine in question is now a member of the cluster.
12.2.6. Creating a New Cluster Group
Recall that groups are simply containers of resources that have failover and failback policies applied to them. If you are creating a new set of resources, first create a group to store them.
To create a new group in an existing cluster, follow these steps:
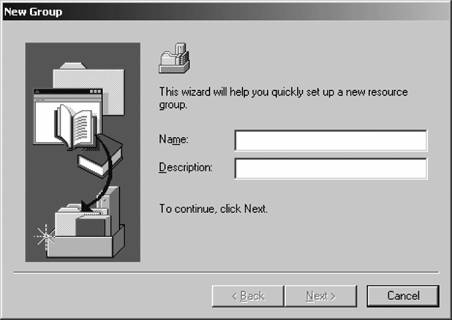
Within the Cluster Administrator console, connect to the cluster that will host the new group. In the left pane, right-click Active Groups under a node in the cluster and select Group from the New menu. The New Group Wizard appears next, as shown in Figure 12-19. Enter a name and friendly description of the new cluster group, and then click Next.
The Preferred Owners screen appears next, as shown in Figure 12-20. On this screen you can specify particular cluster nodes that you'd prefer to actually own the share and in what order those nodes fall in preference. The available nodes are listed on the right; use the Add and Remove buttons in the middle of the screen to adjust their positioning. To change the priority in the right column, use the Move Up and Move Down buttons. Once you're finished, click Finish.
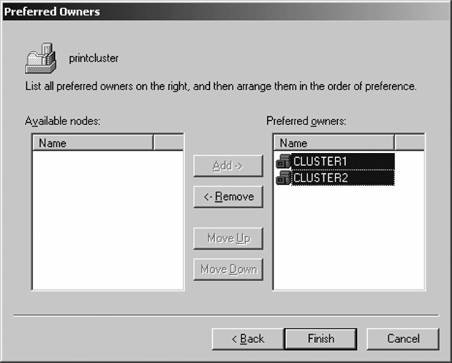
Click Finish to create the group.
The group is created for you. However, its initial state will be set to offline because you have no resources associated with the new groupat this point, it is merely an empty designator.
12.2.7. Adding a Resource to a Group
Continuing our example, let's add a physical disk resource to our new server group:
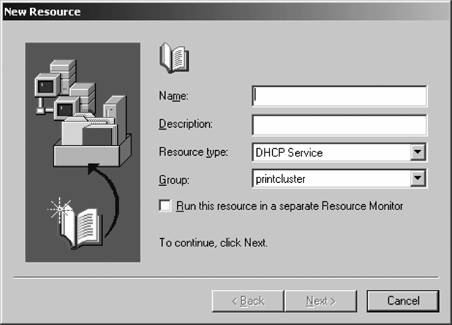
Within Cluster Administrator, connect to the cluster you'd like to manage. Right-click the appropriate group and from the New menu, select Resource. The New Resource Wizard appears next, as shown in Figure 12-21. Enter a name and friendly description for the new resource. Then, from the Resource type drop-down box, select Physical Disk. Make sure the selection in the Group box matches the appropriate resource group you created in the previous section. Click Next to continue.
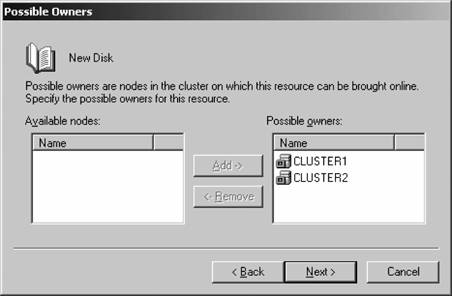
The Possible Owners screen appears next, as shown in Figure 12-22. Here, specify the nodes of the cluster on which this resource can be brought online. Use the Add and Remove buttons to trade positions in the left and right columns on the screen. Click Next when you're finished.
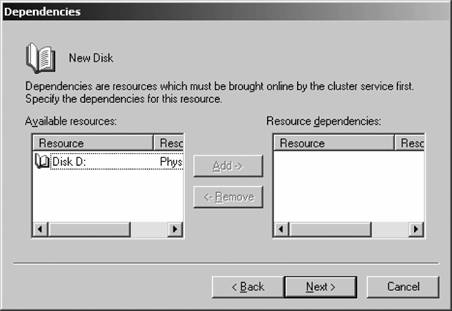
The Dependencies page appears next, as shown in Figure 12-23. If this is the first resource in a group, leaving this screen blank is fine; otherwise, specify any other resources in the group that must be brought up first before this resource can function. Click Next when you've finished.
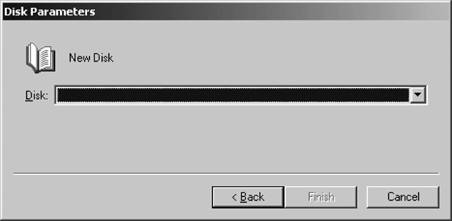
The Disk Parameters page appears next, as shown in Figure 12-24. The drop-down list on this page shows all the disks available for use by the cluster. Select the appropriate physical disk, and then click Finish.
The new physical disk resource is created.
12.2.8. Using the Cluster Application Wizard
You can use the Cluster Application Wizard to prepare your cluster for introducing an application. Part of the wizard's job is to create a virtual server for the application: essentially, virtual servers are simple ways to address a combination of resources for easy management. Virtual servers consist of a distinct resource group, a non-DHCP IP address, and a network name, as well as any other resources required by whatever application you want to cluster.
Once the virtual server has been created, you configure the path and directory of the application you want to cluster and then set advanced properties and failover/failback policies for the entire virtual server, automating the failure recovery process.
Let's step through the Cluster Application Wizard and configure our own fault-tolerant application, Notepad:
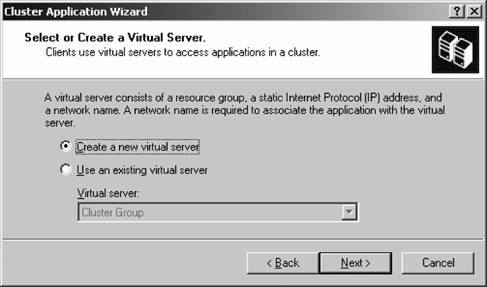
From within the Cluster Administrator console, select Configure Application from the File menu. The Cluster Application Wizard will appear. Click Next off of the introductory screen. The Select or Create a Virtual Server page appears next, as shown in Figure 12-25. You can choose to create a new virtual server or select an existing one from the drop-down list box. Click Next to continue.
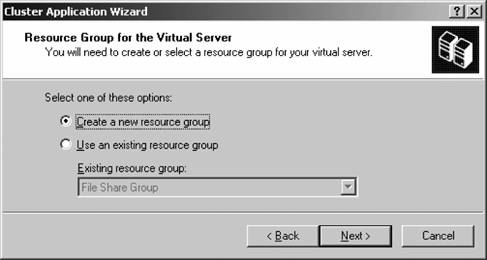
The Resource Group for the Virtual Server screen appears next, as shown in Figure 12-26. Identify the resource group by either creating a new one or selecting an existing one that will handle the resources needed by your application. In this example, we'll continue to use an existing oneif you elect to create a new one, the process is much like that described in the previous section. Click Next to continue.
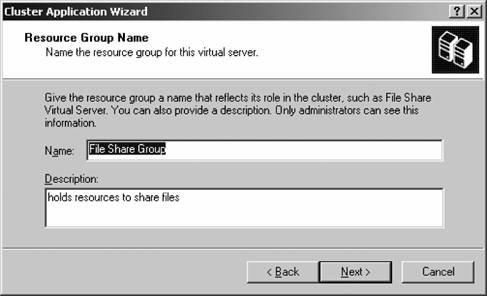
The Resource Group Name screen appears next, as shown in Figure 12-27. This gives you an opportunity to verify the resource group selection you made on the previous screen. Confirm the information, make any necessary changes, and then click Next to continue.
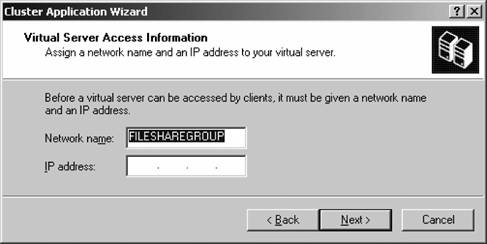
The Virtual Server Access Information screen appears next, as shown in Figure 12-28. Here you specify a dedicated, static IP address for communicating with the new virtual server. Enter the name and IP address you like, and then click Next.
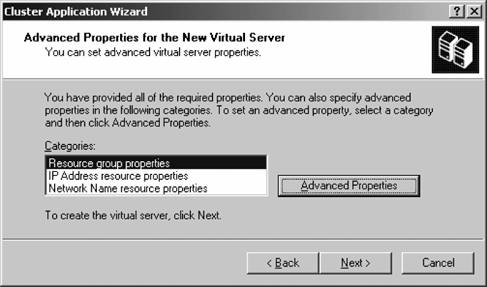
The Advanced Properties for the New Virtual Server screen appears next, as shown in Figure 12-29. On this screen, you can choose any element of the virtual server you've just created and modify its advanced properties. Select the item, and then click the Advanced Properties button to modify the properties. Otherwise, click Next to continue.
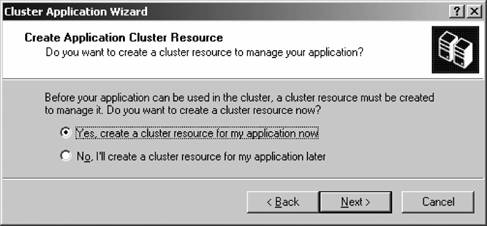
The Create Application Cluster Resource screen appears next, as shown in Figure 12-30. Windows needs to create a cluster resource to manage the fault tolerance of the resources contained in your new virtual server. Go ahead and allow Windows to create a cluster resource now by clicking the first option and then clicking Next.
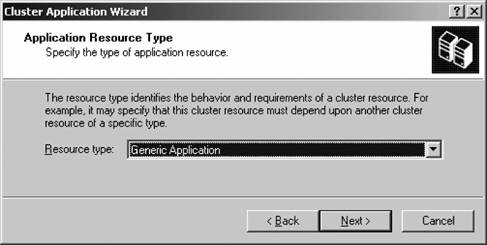
The Application Resource Type screen appears next, as shown in Figure 12-31. Specify the resource type for your new application, as described earlier in this chapter, and then click Next. For this example, I'll just configure a Generic Application type resource.
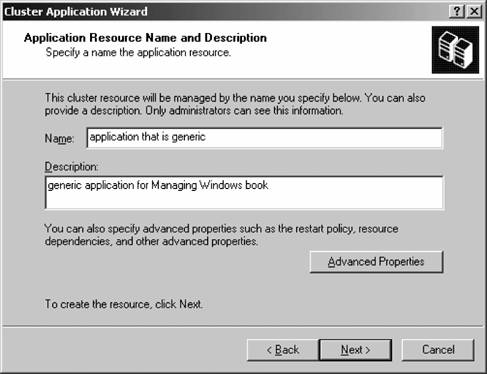
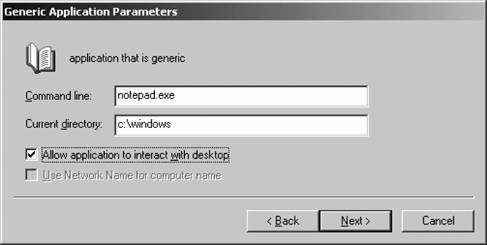
The Application Resource Name and Description page appears next, as depicted in Figure 12-32. Here, name the new resource and enter a friendly description, which is used only for administrative purposes. Click the Advanced Properties button to configure policies on application restart, dependencies on resources, and possible owners of the application. Click Next when you've finished. The Generic Application Parameters screen appears next, as shown in Figure 12-33. Enter the command that executes the application and the path in which the application resides. Choose whether the application can be seen at the cluster console using the Allow application to interact with desktop screen, and then click Next.
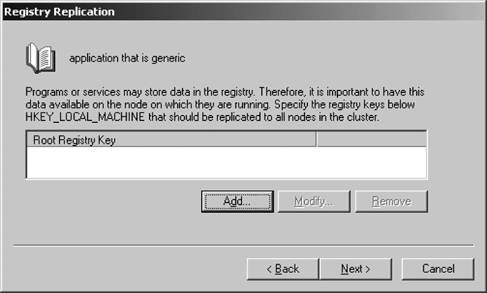
The Registry Replication screen appears next, as shown in Figure 12-34. Enter any registry keys that are required by the application. These will be moved to the applicable active node automatically by the Cluster Service in Windows. Click Next when you've finished. The Completing the Cluster Application Wizard appears next. Confirm your choices on this screen, and then click Finish.
The new virtual server and cluster resource then is created and is shown within the Cluster Administrator console. When you bring the group online, you'll notice that a Notepad window is opened in the background. If you close Notepad, it will automatically relaunch itself. This is the power of the cluster, demonstrated in a simple form, of course.
12.2.9. Configuring Failover and Failback
Once you have resources, groups, virtual servers, and applications configured in your cluster, you need to specify failover
and failback
policies so that upon a failure your cluster behaves as you want it to behave. In this section, I'll detail how to configure each type of policy.
 | Failover is configured automatically on a cluster with two or more nodes. Failback is not. |
|
12.2.9.1. Failover
You can configure a failover policy by right-clicking any group within the Cluster Administrator console and selecting Properties from the pop-up context menu. Once the properties sheet appears, navigate to the Failover tab. A sample Failover tab for a group is shown in Figure 12-35.
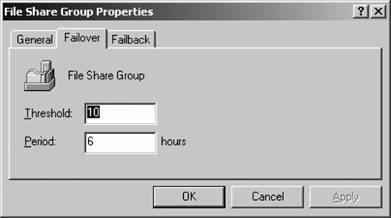
On this tab, specify the threshold, which is the maximum number of times this particular group is allowed to fail over during a specific timeframe, as specified by the period option. If there are more failovers than specified in the threshold value, the group enters a failed state and the clustering service won't attempt to bring it back to life.
Click OK when you've entered an appropriate value.
12.2.9.2. Failback
You also can configure a failback policy by right-clicking any group within the Cluster Administrator console and selecting Properties from the menu. Navigate to the Failback tab, a sample of which is shown in Figure 12-36.
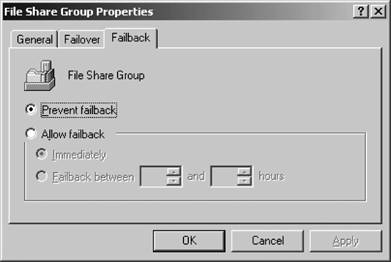
You can set the option to prevent failback, meaning that when a failed node that originally hosted the group returns to normal functionality, the migrated group will not return and will remain on its new host. If you decide to allow failback, you can choose how quickly the group will return to its original hosteither immediately, or between a certain period of time.
 |


