3.3. NTFS File and Folder PermissionsFile- and folder-level permissions are one of the most dreaded and tedious tasks of system administration. However, they are significant in terms of protecting data from unauthorized use on your network. If you have ever worked with Unix permissions, you know how difficult they are to understand and set: complex CHMOD-based commands, with numbers that represent bits of permission signaturesit's so easy to get lost in the confusion. Windows Server 2003, on the other hand, provides a remarkably robust and complete set of permissions, moreso than any common Unix or Linux variety available today. It's also true that no one would argue how much easier it is to set permissions in Windows than to set them in any other operating system. That's not to say, however, that Windows permissions are a cinch to grasp; there's quite a bit to them. 3.3.1. Standard and Special PermissionsWindows supports two different views of permissions: standard and special . Standard permissions are often sufficient to be applied to files and folders on a disk, whereas special permissions break standard permissions down into finer combinations and enable more control over who is allowed to do what functions to files and folders (called objects) on a disk. Coupled with Active Directory groups, Windows Server 2003 permissions are particularly powerful for dynamic management of access to resources by people other than the system administratorfor example, in the case of changing group membership. (You'll meet this feature of Active Directory, called delegation, in Chapter 5.) Table 3-1 describes the standard permissions available in Windows.
The following key points should help you to understand how permissions work:
Windows also has a bunch of permissions labeled special permissions, which, simply put, are very focused permissions that make up standard permissions. You can mix, match, and combine special permissions in certain ways to make standard permissions. Windows has "standard permissions" simply to facilitate the administration of common rights assignments. There are 14 default special permissions, shown in Table 3-2. The table also shows how these default special permissions correlate to the standard permissions discussed earlier.
The default special permissions are further described in the following list:
You also can create custom combinations of permissions, known as special permissions, other than those defined in Windows Server 2003 by default; I cover that procedure in detail later in this section. 3.3.2. Setting PermissionsSetting permissions is a fairly straightforward process that you can perform through the GUI. To set NTFS permissions on a file or folder, follow these steps:
Figure 3-8 shows the process of assigning write rights to user Lisa Johnson for a specific folder. Figure 3-8. Granting permissions on a folder to a user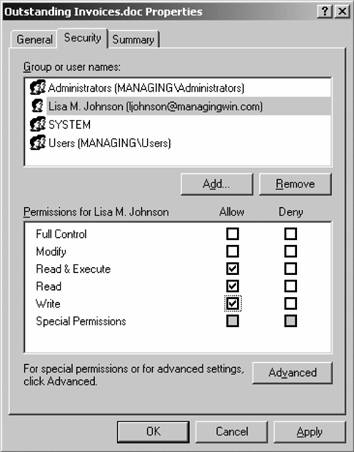
If a checkbox under Allow or Deny appears gray, this signifies one of two things: that the permissions displayed are inherited from a parent object (I discuss inheritance in more detail in the next section), or that further special permissions are defined that cannot be logically displayed in the basic Security tab user interface. To review and modify these special permissions, simply click the Advanced button. On this screen, by using the Add button you can create your own special permissions other than those installed by default with Windows Server 2003. You also can view how permissions will flow down a tree by configuring a permission to affect only the current folder, all files and subfolders, or some combination thereof. 3.3.3. Inheritance and OwnershipPermissions also migrate from the top down in a process known as inheritance . This allows files and folders created within already existing folders to have a set of permissions automatically assigned to them. For example, if a folder has RX rights set, and you create another subfolder within that folder, users of the new subfolder will automatically encounter RX permissions when they try to access it. You can view the inheritance tree by clicking the Advanced button on the Security tab of any file or folder. This will bring up the screen shown in Figure 3-9, which clearly indicates the origin of rights inheritance in the Inherited From column. Figure 3-9. Viewing the origin of permissions inheritance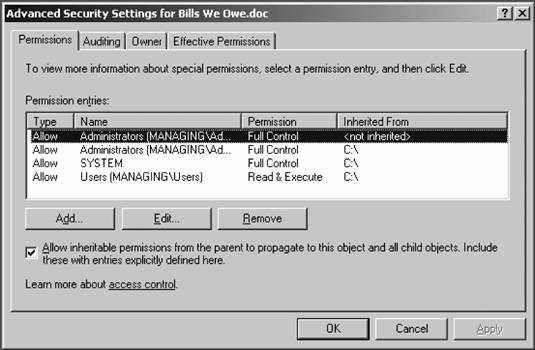
You can block this process by unchecking the Allow inheritable permissions from parent to propagate to this object checkbox on the screen in Figure 3-9. Any children of the folder for which you've stopped inheritance will receive their permission from that folder, and not from further up the folder tree. Also, if you ever decide to revert to standard permissions inheritance on an object for which you've blocked the process, simply recheck the checkbox. Custom permissions that you've defined will remain, and all other permissions will automatically trickle down as usual. There also is a concept of ownership. The specified "owner" of a file or folder has full control over the file or folder and therefore retains the ability to change permissions on it, regardless of the effect of other permissions on that file or folder. By default, the owner of the file or folder is the object that created it. Furthermore, there is a special permission called Take Ownership that an owner can assign to any other user or group; this allows that user or group to assume the role of owner and therefore assign permissions at will. The administrator account on a system has the Take Ownership permission by default, allowing IT representatives to unlock data files for terminated or otherwise unavailable employees who might have set permissions to deny access to others. To view the owner of a file, click the Owner tab on the Advanced Permissions dialog box. The current owner is displayed in the first box. To change the ownerassuming you have sufficient permissions to do sosimply select a user from the white box at the bottom and click OK. Should the user to whom you want to transfer ownership not appear in the white box, click Other Users and Groups, then click Add, and then search for the appropriate user. You also can elect to recursively change the owner on all objects beneath the current object in the filesystem hierarchy. This is useful in transferring ownership of data stored in a terminated employee's account. To do so, select the checkbox for Replace owner on subcontainers and objects at the bottom of the screen. Click OK when you've finished. (This operation can take a while.) 3.3.4. Determining Effective PermissionsAs a result of Microsoft's inclusion of RSoP tools in Server 2003, you can now use the Effective Permissions tab on the Advanced Permissions screen to view what permissions a user or group from within Active Directory or a local user or group would have over any object. Windows examines inheritance, explicit, implicit, and default ACLs for an object, calculates the access that a given user would have, and then enumerates each right in detail on the tab. Figure 3-10 demonstrates this. The Effective Permissions display has two primary limitations. First, it does not examine share permissions. It concerns itself only with NTFS filesystem-based ACLs, and therefore, only filesystem objects. And second, it functions only for users and groups in their individual accounts. It will not display correct permissions if a user is logged in through a remote access connection or through Terminal Services, and it also might display partially inaccurate results for users coming in through the local Network service account. Although these are reasonably significant limitations, using the Effective Permissions tool can save you hours of head scratching as to why a pesky Access Denied message continues to appear. It's also an excellent tool to test your knowledge of how permissions trickle down, and how allow and deny permissions override such inheritance at times. Figure 3-10. The Effective Permissions tab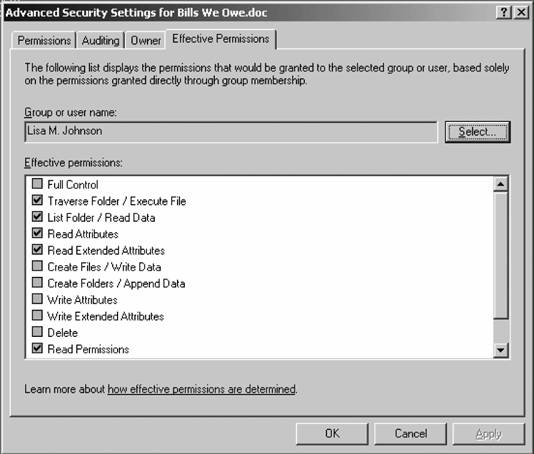
3.3.5. Access-Based EnumerationABE is a great feature that (and I'm not sure why) hasn't been included in releases of Windows Server to date. Essentially this removes any access-denied errors for users by showing them only what they're allowed to access; if they don't have permission to use a file, browse a folder, or open a document, then it won't appear in whatever file management tool they're using at the time. This also closes an arguably moderately significant security hole, in that if users can see folders they're not able to access it might prompt hacking attempts or other tries to circumvent security, whereas one is less likely to hack what one doesn't know is there. Or so the theory goes. It looks like the real drawbacks at this point are:
You can download the ABE installer from: or, if you'd rather not type in a URL that long, I've provided a link to the tool from my blog entry at: It's easy to install. Simply download the tool and double-click on the resulting installable file. You'll be asked for the appropriate disk to install on, and then you can select whether you'd like to have ABE enabled on all shared folders on that particular system or if you'd rather enable it on a folder-by-folder basis.
Once installation is complete, you can see the extremely simple ABE interface by right-clicking on any shared folder from within Windows Explorer, selecting Properties, and then clicking on the Access-Based Enumeration tab. This is shown in Figure 3-11. To apply ABE to the current folder, click the first checkbox. You can also choose to apply the setting in the first checkbox to all other shared folders on that particular machine by selecting the second checkbox. What will your users see? Nothingthat is, nothing that they don't have permissions to access. It's a seamless add-in. 3.3.6. AuditingObject access auditing is a way to log messages concerning the successful or unsuccessful use of permissions on an action against an object. Windows Server 2003 writes these messages to the Security Event Log, which you can view using the Event Viewer in the Administrative Tools applet inside the Control Panel. First, though, you must enable auditing at the server level and then enable it on the specific files and folders you want to monitor. Figure 3-11. The Access-based Enumeration tab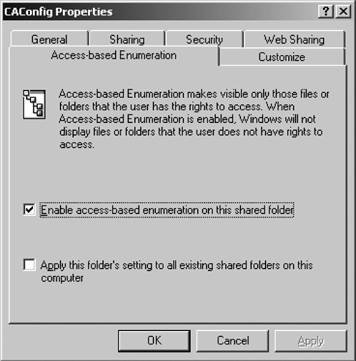
You can enable auditing overall in one of two wayseither on a system-by-system basis by editing the local system policy, or on selected machines (or all machines) participating in a domain through GP. In this section, I'll focus on editing local system policies. To begin, follow these steps:
Audit events for the appropriate types of accesses will now be written to the Security event log as they happen. Here is a quick summary of enabling auditing through domain-based GPs: create a new GPO linked to a selected container of machines, and navigate through Computer Configuration, Windows Settings, Security Settings, and Local Policies to Audit Policy. Select the appropriate events, and click OK. Give the domain controller a few minutes to replicate the policy to other domain controllers in the domain, and then refresh the policy on your client machines through gpupdate /force or by rebooting the machines. Now, select the objects within the filesystem you want to audit and right-click them. Choose Properties and click the Security tab in the resulting dialog box. Then click Advanced and select the Auditing tab. You'll be presented with a screen much like the one shown in Figure 3-12. Figure 3-12. Enabling auditing on an object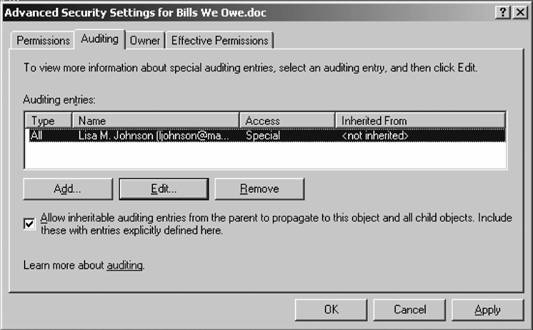
Assigning audit objects in Windows is much like assigning permissions. Simply click Add, and a dialog will appear where you can enter the users to audit. Note that audit instructions work for both users and groups, so although you might not care what members of the Administrators group do, those in Finance might need a little more monitoring. Click OK there, and then select what actionsa successful object access or a failed useof an event should be written to the log. You can easily specify different auditing settings between the various permissions, saying that you don't want to know when someone fails to read this object but you want to know whenever someone adds to it. Auditing is a helpful way to keep track of what's happening on your file shares. |