7.6. Windows Server Update ServicesThe bane of every administrator's existence. The pain in the rear of system management. That never-ceasing headache that pounds at CIOs everywhere. You might have guessed by now that I'm speaking of patch management. And I use the term "management" loosely. In 2003, there were more than 40 updates that needed to be applied to a new Dell computer running Windows XP. There were over 20 updates for Windows 2000 Service Pack 3 that needed to be applied to new systems before Microsoft released Service Pack 4 in the summer of 2003. And right now, machines running Windows XP Service Pack 2--released in summer of 2004--need around ten patches, including a couple that require rebootsto get up to speed. This ever-growing hairball of security fixes, bug fixes, critical updates, and patch revisions has almost gotten to the point where it would be easier to disconnect all machines from the Internet and work with stone tablets than deploy new systems. It shouldn't be that way, and Microsoft realizes that. They've come out with a tool that's not perfect, that has limited functionality, and isn't very flexible. But it's got two great things going for it: It's timely, and it works fairly well. That product is Windows Server Update Services (WSUS), and this chapter will focus on installing, implementing, and administering WSUS on your network. I'll also cover a comparison between WSUS and a flagship network and system-management product (Systems Management Server), and how to monitor WSUS for failures. 7.6.1. About Windows Server Update ServicesAs part of its Strategic Technology Protection Program, Microsoft sought to leverage its Windows Update technologythe software that runs the universal update site for all but the oldest versions of Windowsand integrate it into a LAN-based patch management solution. WSUS at this point does NOT focus on adding new features to already released software; it's only concerned with critical updates that allow administrators to somewhat easily deploy critical updates to servers running Windows 2000 or Windows Server 2003, and desktop computers running Windows 2000 Professional or Windows XP Professional. It's designed to work especially in networks with an Active Directory implementation, but it will function without one. Installing WSUS on your network requires at least one server, running either Windows 2000 Server or Windows Server 2003 (for the purposes of this chapter, I'll assume you're using the latter) connected to the Internet running the actual server component of WSUS. This server needs, for all practical purposes, at least a 1 GHz processor and 512 MB of RAM. This machine acts as a local version of the public Windows Update site, which contains critical updates and service packs for all supported operating systems. This server synchronizes with the public Windows Update site on a schedule that the corporate administrator selects. That administrator then approves or rejects the availability of certain updates on the WSUS server. You can also have multiple WSUS servers on an intranet and configure which client machines are directed to specific WSUS servers for updates. On the client side, WSUS also requires the Automatic Updates feature of Windows 2000 Service Pack 3 and higher, Windows XP Professional at any revision level, or any edition of Windows Server 2003. Directed by a variety of methods, the client computers that are running this Automatic Updates feature are sent to the local network's WSUS server on a set schedule to download updates appropriate to their machines. The WSUS server will analyze the operating system, service-pack level, and any currently installed updates, and push only those updates that are both needed AND that have been approved by the administrator beforehand. 7.6.2. Using Windows Server Update Services: On the Server SideThere are a few phases to the WSUS installation. First, you should download and install the software, which includes the Windows SQL Server 2000 Desktop Engine (WMSDE):
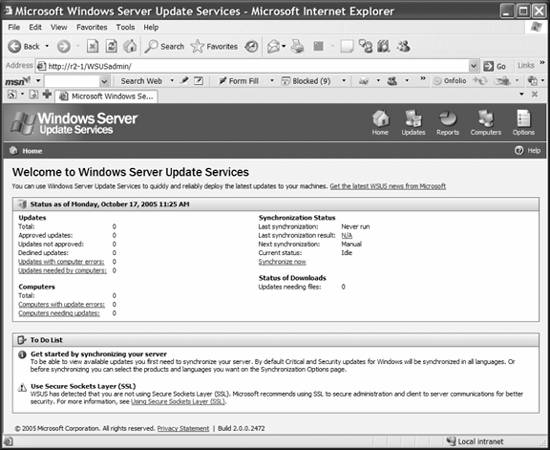
The next step is to make sure that your WSUS server can receive update information from the Internet. If you restrict Internet access via your firewall to certain domains, be sure to add the following domains to your exceptions list: 7.6.2.1. The administrative consoleTo open the administrative console for WSUS, open the Start menu, point to All Programs, Administrative tools, and then select Microsoft Windows Server Update Services. You can also open this console from your web browser by surfing to http://WSUSServerName/WSUSAdmin. You can also navigate through Start, All Programs, Administrative Tools, and click Windows Software Update Services. You'll see something much like that in Figure 7-16. You may need to set a proxy server configuration if you use such a system to connect to the Internet. To do so, on the console toolbar, select Options, and then click Synchronization Options. Select the Use a proxy server when synchronizing checkbox in the Proxy server box, and then enter the appropriate name and port number. (This form is used in much the same way that you would Internet Explorer's options.) You can also enter credentials should they be needed by clicking the Use user credentials to connect to the proxy server box. To apply these settings, click Save settings under Tasks, and then click OK to confirm this action. 7.6.2.2. Synchronizing contentWhen you start the content synchronization process, which actually retrieves the updates for you to configure and deploy, the WSUS server goes out to either the public Windows Update servers or another local WSUS server (as configured in the "Mirror Update Settings" section) and downloads the entire library of available critical updates and service packs for each language you've configured. This initial synchronization usually results in about 150 MB worth of data being transferred for just Figure 7-16. The WSUS administrative screen
English updates, or close to 600 MB of data for updates in every localization. After that, WSUS is able to determine if any new updates have been released since the last time you synchronized. To synchronize content, surf to the WSUS administrative web site, and then do the following:
There are also some advanced synchronization options that you can set, which can all be found under Options on the toolbar and Synchronization Options. Under Update Files and Languages, click Advanced, then read the warning and click OK. Then, select your preferred option or options:
7.6.2.3. Creating a computer groupComputer groups are an important part of even the most basic WSUS systems. Computer groups enable you to target updates to specific sets of computers that likely share some common criteria. WSUS ships with two default groups, called All Computers and Unassigned Computers. When each client computer initially contacts the WSUS server (more on that process a bit later in the chapter), the server adds it to both these groups. Of course, it's likely that you'll want to create your own computer groups, since you can control the deployment of updates much more granularly with them. For example, you can create a group named Test that contains some lab machines. You can initially deploy a new patch to the test group, and then, once you've verified the patch works on those machines, roll it out to other groups. Since there's no limit to the number of custom groups you can create, you can also block off machines into departments, function, roles, or any other denominator you wish to use. Setting up computer groups takes three steps. First, specify whether you intend to use server-side targeting, which involves manually adding each computer to its group by using WSUS; or client-side targeting, which involves automatically adding the clients by using either Group Policy or registry keys. Next, create the computer group on WSUS. Finally, move the computers into groups by using whichever method you chose in the first step. In this section, I'll talk about server-side targeting, since it's the most likely method you'll use by far. To specify that you'll use server-side targeting to select members of computer groups:
Next, create a computer group. In this example, we'll create the Test group I mentioned earlier:
Finally, add a machine to that group. Of course, you'll need to follow the instructions within the client-side portion of this chapter to get the Automatic Updates software deployed, which will populate the WSUS console with a list of available computers. Once that's done, though, follow these steps to add a machine to a group:
And that's all there is to it. Lather, rinse, and repeat until you have a group structure appropriate to your network and deployment methodology. 7.6.2.4. Approving contentNow that you have an actual library of updates on or near your WSUS host machine, and you've defined a couple of computer groups, you can approve the updates individually for distribution to client machines within your network. The approval process makes it easy to withhold patches until further testing is done, which partly assuages the general fear that's caused by installing patches that might cause more problems than they fix. To begin the update approval process, do the following:
WSUS will notify you when the approval is complete. In the righthand pane, where all the updates are shown, each patch's status is shown as one of five possible values. A new update is one that was just recently downloaded and hasn't been approved yet. An approved update is available for distribution to each client machine. An update that isn't approved will not be distributed to clients, but the actual patch file remains in the library on the WSUS host machine. An updated patch indicates a new version of an earlier patch that currently exists in the library. And finally, a temporarily unavailable patch is one whose dependent files were downloaded incorrectly, could not be found, or were otherwise unable to be located by WSUS. If, for some reason, you would like to clear the list of approved updates, you can clear all checkboxes on the list of available updates and then click Approve. This will remove any available updates from the WSUS catalog, and your client machines will stop downloading the updates until you approve more fixes. This will not, however, uninstall the patches from the client machines. 7.6.2.5. Checking the status of update deploymentsOnce a full 24 hours has passed, you can check the status of the approved update deployment. On the console toolbar, click Reports, and then on the resulting page, click Status of Updates. You can apply a filter by adjusting the settings under View, and you can change the view (perhaps to see the status of an update by computer group and then by computer, for example) by adjusting the controls on that page. You can also print a status report by clicking "Print report" under Tasks. 7.6.2.6. Pushing out the automated updates clientOnce your client computers first contact the WSUS server, the latest Automatic Updates software installed on your client computers will self-update to the latest version. There is one exception to this: the version of Automatic Updates included with Windows XP without any service packs cannot update itself automatically. You'll need to manually push this out via Group Policy, a login script, or "sneakernet"-style management. You can install the updated Automatic Updates client on your clients by using the MSI install package, self-updating from the old Critical Update Notification (CUN) tool, installing Windows 2000 Service Pack 3 or 4, installing Windows XP Service Pack 1 or 2, or installing Windows Server 2003. You can download the Automatic Updates client from the Microsoft web site at the WSUS web page, located at http://www.microsoft.com/WSUS. On a standalone machine, the AU client can simply be added by running the MSI file on the machine. Manually installing a file can quickly become a pain when you have more than just a few machines to handle. Fortunately, because the client installation program is in the form of an MSI, you can easily push the program to clients by using Group Policy. To create a new GPO, assign it to your computers, and then have it installed automatically:
You can also deploy the client MSI through a logon script by calling MSIEXEC followed by the client software file name as an argument. The software will be installed as requested. 7.6.2.7. Configuring the automatic updates clientThe Automatic Updates client doesn't have any user-interface options for determining the origin of updates to install. You must set this with either a Registry change on each of the client computers or through Group Policy, either locally or based through a domain. Once the changes take effect, you'll be able to see the machines within the Computers page of the WSUS console. Through a domain-based Group Policy, direct clients to the WSUS server by using the following procedure:
These options are described here in more detail:
You will want to allow 10 to 15 minutes for the changes to the domain's policy to replicate among all domain controllers. To manually initiate detection of these client machines, on the client, open a command prompt and type wuauclt.exe /detectnow. To adjust the Group Policy on a machine that isn't managed by Active Directory, you need to load the appropriate templates into the Microsoft Management Console. Follow these steps:
You can now adjust the policy settings as described in the previous subsection. Finally, to adjust some of these behavior settings through Registry changes, use the appropriate key for each of the following settings:
7.6.3. Using WSUS: On the Client SideTo configure Windows XP to work with WSUS, first enable the Automatic Updates feature. In Windows XP, do the following:
In Windows 2000, do the following:
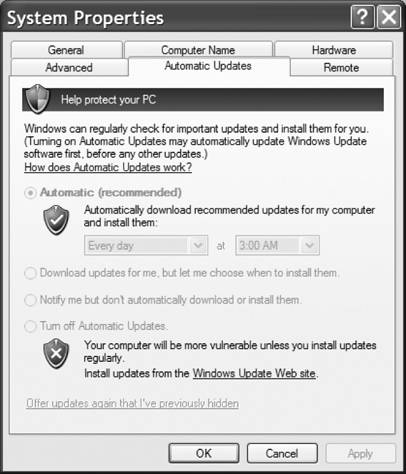
You'll see the System Properties dialog box for the feature, as shown in Figure 7-18. Figure 7-18. Configuring Automatic Updates on the client side
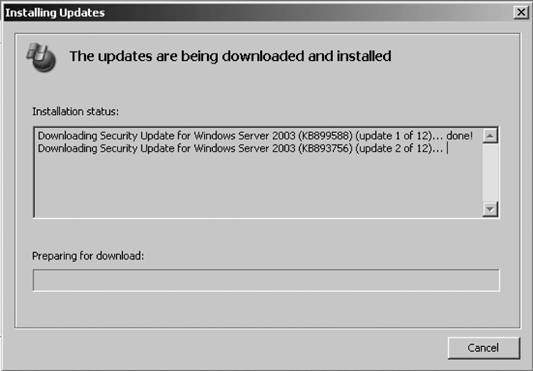
As the administrator, you select how updates are downloaded, signaled to the user, and subsequently installed on client machines. The currently logged-on user, if that person happens to have administrator credentials, is notified through a small update icon in the system tray as well as an information "bubble" that pops up when the download is complete. In addition, an administrator can determine if updates have been downloaded by looking at the system log. If the current user isn't an administrator, Windows will wait until one logs on to offer the notification that updates are available for installation. 7.6.3.1. Update download and installationUpdates are downloaded in a background thread by the Background Intelligent Transfer Service (BITS), which is an extension to Windows. BITS detects inactivity over a network connection and uses it to download large amounts of data from remote sites. BITS will detect when a user initiates activity over a connection and then pause the download process, waiting for the next idle period to resume it. On the Automatic Updates property sheet, click the first option to have the currently logged-on user notified before downloading updates. The user will then be notified again before installing the downloaded updates. Use the second option if you want updates automatically downloaded, but want to wait until a logged-on user acknowledges their presence and authorizes the installation. Finally, click the third option if you want updates automatically downloaded and installed on a schedule that you can set in the boxes. The update installation process proceeds depending on what you select in the boxes. When updates have finished downloading, the notification bubble will appear in the system-tray area of the machine, and an administrative user can double-click the bubble to open the Ready to Install dialog box, shown in Figure 7-19. Figure 7-19. The Ready to Install dialog box
You can click the Remind Me Later button to defer the installation of updates for a set period of time, ranging from half an hour to three days from the current time. If you've configured Automatic Updates to install fixes on a regular schedule, the updates will be downloaded in the background and automatically installed on that schedule. Automatic Updates installs the update and restarts the computer if an update requires that, even if there's no local administrator logged on. If an administrator is logged on, she will have the chance to cancel the process; if a normal user is logged on, he will receive a notification of the impending process and a countdown to its initiation. However, if updates have finished downloading between the configured install time and the current time, the notification will appear in the system tray as described earlier in this section. The user will not have the option to click Remind Me Later, but he can choose to install the updates at that time to have the process over with before the predetermined installation time. 7.6.3.2. Monitoring the client-side systemWSUS and the Automatic Updates client provide several event templates that are written to the system event log to describe the current status of the update process, any errors that are encountered, and a brief notation of what updates were successfully installed. You can program an event-log monitoring tool to monitor for certain event IDs that are specific to WSUS. This tool will give you a picture of your network's health with regards to updates. Table 7-3 lists these events and their meanings and contexts.
|