8.7. SMTP ServicesBusiness today is conducted over Internet email in nearly the same volume as over the telephone network. The instantaneous nature of virtual communication has real advantages over playing phone tag, not to mention the fact that email is cost effective, more available, and easier to manage than a phone call. IIS includes an SMTP component that allows your server to send and receive mail on the Internet with the big boys. The Windows Server 2003 Internet mail solution consists of two components: the SMTP server, which I'll discuss in this section, and the POP3 server, which is coming in the next section. The SMTP server acts as the switchboard, sending mail to different hosts based on different email addresses and receiving inbound mail routed for your domain. The POP3 server acts as a post office for your local organization, retrieving email that was delivered via the SMTP component and transferring it to individual users' mailboxes. Like most other components of IIS, the default SMTP server created upon installation works as a virtual server. However, to dig deeper, let's create a new virtual server and then look at its configuration options. 8.7.1. Creating a New SMTP Virtual ServerDuring IIS 6 installation, a default SMTP virtual server is created that is sufficient for the most basic needs. The default server listens on TCP port 25, as a normal mail server would, and stores the mail it receives in a queue directory, which is, by default, C:\Inetpub\Mailroot\Queue. It also will accept outgoing mail for multiple domains without any reconfiguration. However, if you want to create your own SMTP virtual server, a wizard exists to assist you. In IIS Manager, select your machine in the left pane, right-click it, and select SMTP Virtual Server from the New menu. The New SMTP Virtual Server Wizard appears. To complete it, follow these steps:
The new SMTP virtual server has been created. 8.7.2. SMTP PropertiesIn this section, I'll look at adjusting the individual properties of an SMTP server. To modify the properties of a virtual server, right-click the SMTP Virtual Server listed in the left pane of IIS Manager and choose Properties. 8.7.2.1. GeneralFigure 8-30 shows the General tab. Figure 8-30. The General tab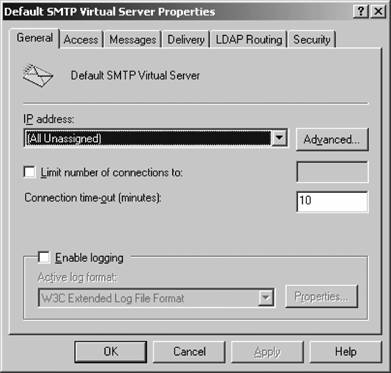
On the General tab, you can specify the IP address and port assignment. You also can limit the number of simultaneous connections, and use an idle timeout setting that will free up stale connections. Plus, you can enable logging in the formats detailed elsewhere within this chapter. 8.7.2.2. AccessFigure 8-31 shows the Access tab. Figure 8-31. The Access tab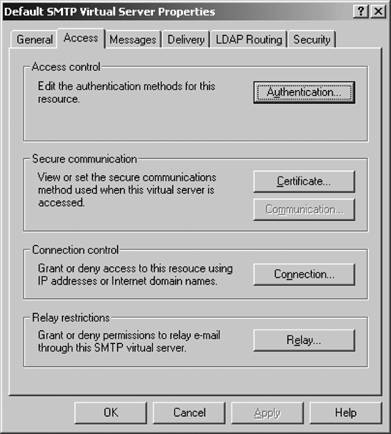
On the Access tab, you can specify how people can send email through your virtual server. Click the Authentication button under the Access control section of the tab. You'll see a screen, called Authentication. Anonymous access to your SMTP server is enabled here by default. In the bottom portion of the box you can specify the method by which non-anonymous users will authenticate. The first option is basic authentication, which negotiates a username and password in clear text between the client and the SMTP server. There's also integrated Windows authentication, which encrypts the username and password and sends it between the client and the server. This uses either the SAM accounts database on the IIS server machine or Windows' built-in integration with Active Directory. Finally, there's SSL authentication, which uses certificates only to establish the identity of a client computer to a server. Either of the latter two options will work if you want credentials to be passed in a secure environment; basic authentication simply passes the credentials over the wire unprotected, leaving an open door for sniffers. Back on the Access tab, you can grant or deny access to a site based on the client's IP address. This is useful if you have an abusive or compromised group of external hosts that are continually attacking your machine, or if you want to restrict users of a site to internal hosts only. Click the Edit button under IP Address and Domain Name Restrictions to configure this. You first select whether all users will be granted or denied access to the site by using the radio buttons at the top of the window. Then you can configure individual exceptions to the rule you just defined in the white list box. Click Add to include an address in the exceptions list. You'll be prompted with a box, asking whether you want to exempt a single computer, a group of computers (an IP subnet), or an entire domain (DNS-based domain, that is). Again, restricting or allowing access based on a DNS domain name is a very expensive operation because each SMTP request must be accompanied by a reverse lookup on the part of the IIS server. This can slow response time considerably and cause processor utilization to increase significantly. Enable this only if you're sure of the consequences or if you have a relatively lightly traveled web site to restrict. Select the appropriate response, and then type in the actual IP address, network number and subnet, or domain name. You can click the DNS Lookup button to perform a reverse lookup on a certain domain name to obtain its appropriate IP numbers. When you're finished, click OK, and you'll be returned to the restrictions box. Now, keep in mind that if you've configured default access for everyone to your site, the excepted addresses will be denied access. Conversely, if you've denied access by default to all IP addresses, the excepted addresses will be allowed access. This might seem obvious, but during a quick change it's easy to become a little confused at the quasi-backward logic. Click OK once you're finished. Finally, the Relay restrictions section of the Access tab enables you to lock down your server so that it can be used only by clients you approve and not by anonymous spammers that could take advantage of your open resource. This functions similarly to the connection control box, where you add IP addresses and allow or deny their access to the server. The difference is that with a relay restriction, you're only saying that these IP address are not allowed to send outgoing mail through this server. With the connection control, you are restricting the ability of a set of addresses to even communicate with the servereither to bring mail to the server or to send outgoing mail. This is an important distinction. Usually, you add local IP addresses on your site to this list and allow only those addresses to talk. Also, you can specify whether computers that authenticate to the SMTP server can send outgoing email, regardless of whether they appear in the list. This is useful for Internet addressesyour clients, as long as they authenticate, still can use the SMTP server even though their address isn't local. 8.7.2.3. MessagesFigure 8-32 shows the Messages tab. Figure 8-32. The Messages tab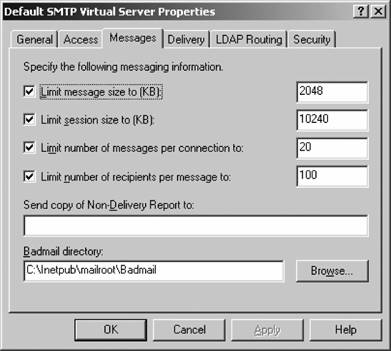
The Messages tab enables you to specify policies on the types of messages to accept through the virtual server. You can limit message size in KB, the size of all messages transferred in a particular session in KB, the number of messages allowed in a particular session, and the number of addressees in a message. You also can specify a particular email address to which to send nondelivery reports (those dreaded bounce messages), and a directory to store mail that can't be delivered so that you can examine it for errors later. 8.7.2.4. DeliveryFigure 8-33 shows the Delivery tab. The Delivery tab enables you to set options that relate to the actual transmission of messages to and from your server. You can specify the first three intervals for retrying delivery of a failed message, and then the interval at which further attempts are tried. You also can set how long the server should try to send a message before sending a notification to the sender, and how long the server should try to send the message before giving up (an "expiration timeout"). Plus, you can set the delay notification and expiration timeout values for messages sent between recipients local to the SMTP server. Figure 8-33. The Delivery tab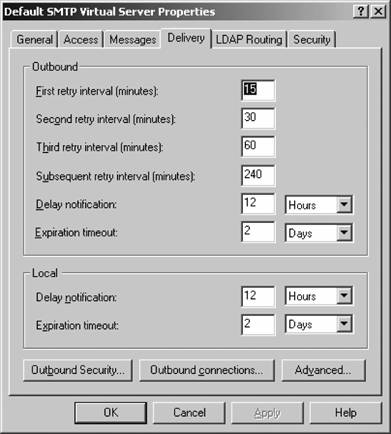
The Outbound Security button enables you to edit the settings used in conjunction with transmitting messages to other SMTP servers. You can set the levels of security used between two SMTP servers talking to each otheranonymous connections, basic authentication, and integrated Windows authentication, all of which I discussed previously in this sectionand the option to perform the integrated Windows authentication using TLS encryption, which is very strong and hard to break.
The Outbound connections button enables you to limit the number of outgoing connections from your virtual server, and to set a stale time limit for those connections. You also can restrict the number of connections per SMTP domain to a certain number. Plus, you can specify the port on which outbound SMTP transactions will be made; the default is 25. Clicking the Advanced button brings up the Advanced Delivery screen, where you configure more complex settings to customize message transmission. The options include the following:
8.7.2.5. LDAP RoutingFigure 8-34 shows the LDAP Routing tab. On the LDAP Routing tab, you can instruct the SMTP server to access an LDAP server for more information on senders or recipients listed in messages coming through the server. Enabling LDAP routing automatically configures the SMTP server to access the currently available Active Directory by default if one is present. You also can specify other LDAP servers by supplying their hostnames, schema types, binding types, the account name and password for accessing it, and the naming context. 8.7.2.6. SecurityFigure 8-35 shows the Security tab. On this tab, you can specify the Windows accounts that should have operator privileges for the SMTP virtual server. Figure 8-34. The LDAP Routing tab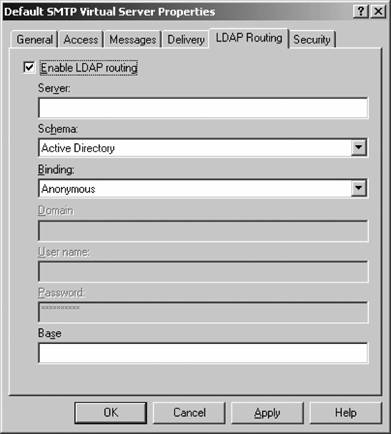
Figure 8-35. The Security tab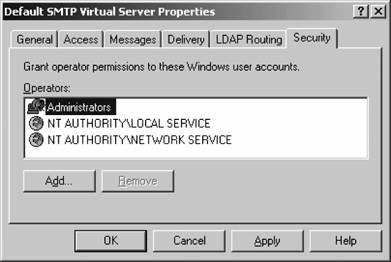
8.7.3. Delivering for Multiple Internet DomainsIf your company has more than one DNS domain, you can configure your SMTP virtual server to send and receive email for both domains. To make the server aware that you have multiple domains , you need to run the New SMTP Domain Wizard, which you can find inside IIS Manager by right-clicking the SMTP virtual server and selecting Domain from the New menu. Next, follow these steps:
Your server is now configured for the new, additional domain. However, if you've selected the new domain to be a remote domain, some additional configuration remains. To access the properties for the remote domain, right-click the remote domain name in the right side of IIS Manager and select Properties. The sheet is shown in Figure 8-36. Figure 8-36. Properties of additional remote domain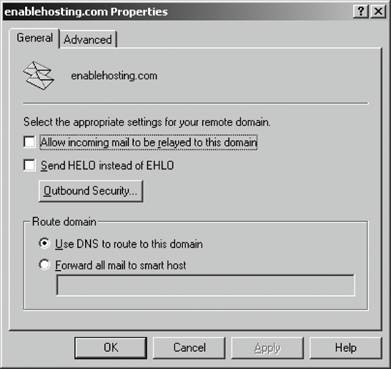
You can configure whether email should forward from somewhere else to this domain (assuming the remote server is forwarding mail to your SMTP server) with the first check. The second option disables extended SMTP, or ESMTP, a useful troubleshooting step if you're having problems sending maildisable this if your mail is bouncing or if you notice a lot of rejected requests in your log files. You also can specify whether to deliver mail using DNS or to forward this new domain's mail to a smart host, much like before. On the Advanced tab of the new domain's properties , you can enable automatic dequeuing of mail using the TURN command in the SMTP protocol. This is useful if you have another server that gets its mail from this server that isn't permanently connected to the Internet. You also can specify the users that are allowed to trigger the dequeuing of mail. |